By: Team T16-2 Since: September 2019 Licence: MIT
1. Introduction
Welcome to the User Guide for Modulo!
Modulo is an all-in-one student life application which is mainly targeted to NUS students. The app features four different functions which consists of weekly organizer, financial record system, quiz revision, and grades tracker.
Those who prefer to work with a Command Line Interface (CLI) might find using Modulo to be more straightforward than the usual Graphical User Interface (GUI) applications. The application has the visual benefits of a GUI but stands strongly rooted in command line usage. Modulo does not require an internet connection to run so there’s no worry when the school wifi goes MIA yet again. The only time you need to be connected is at the start, when downloading the application. Look to Section 2, “Quick Start” to find out how to get started on Modulo!
2. Quick Start
-
Make sure that
Java 11or above is installed in your computer. Otherwise, you can download Java 11 here.-
Enter the follow command in Command Prompt for Windows or Terminal on Mac to check your current version of Java:
java --version
-
-
Download the latest
modulo.jarhere. -
Copy the
.jarfile to a folder you wish to set as your working directory for the application. -
Double-click the file to start Modulo. If the GUI does not appear in a few seconds, please try running
java -jar modulo.jarin your command prompt or terminal.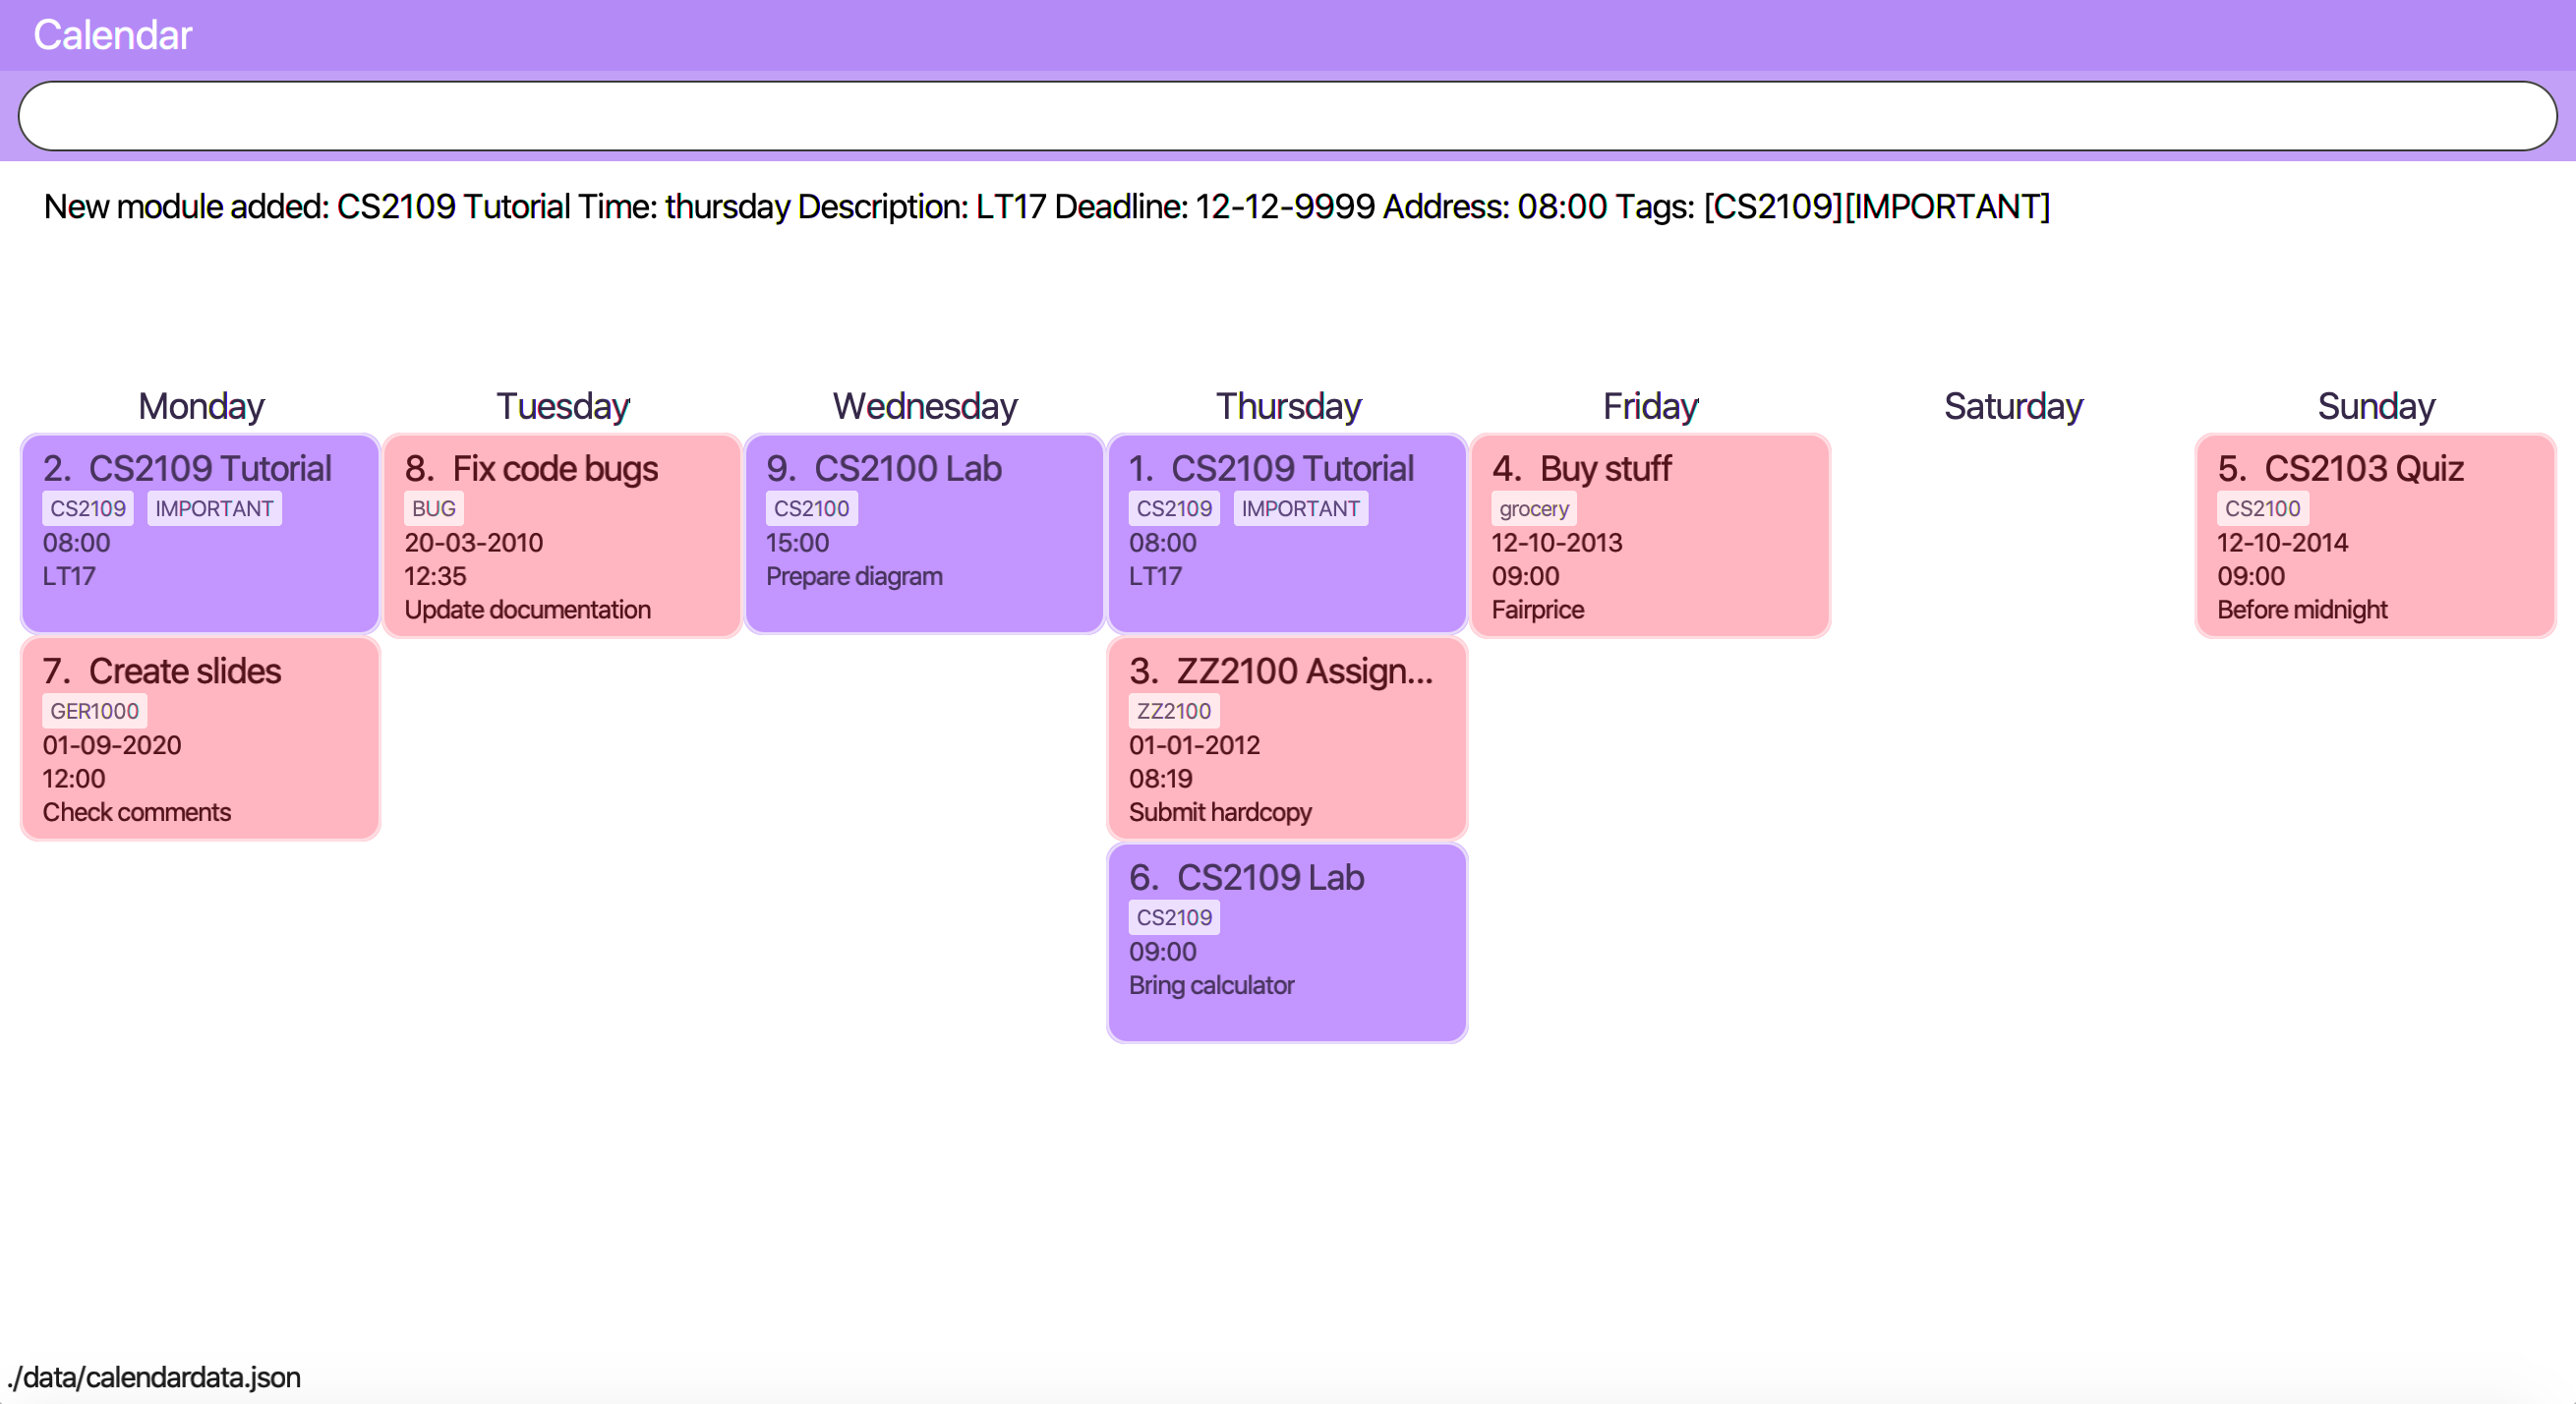
-
Type the command in the command box and press Enter to execute it.
-
add <title>CS2109 Assignment <day>tuesday <desc>Submit code through LumiNUS <deadline>21-10-2019 <time>13:00: adds a to-do task to Modulo -
add CS2103 1920S1: adds moduleCS2103to academic year and semester1920S1 -
add <qns> What can one catch that is not thrown? <type> normal <ans> A cold <cat> CS2131: adds a new quiz question to categoryCS2131 -
exit: exits the app
-
-
Refer to Section 3, “Features” for details of each command.
3. Features
Command Format
-
Words in
UPPER_CASEare the parameters to be supplied by the user e.g. inadd <n>NAME,NAMEis a parameter which can be used asadd <n>John Doe. -
Items in square brackets are optional e.g
<n>NAME [<t>TAG]can be used as<n>John Doe <t>friendor as<n>John Doe. -
Items with
… after them can be used multiple times including zero times e.g.[<t>TAG]…can be used as<t>friend,<t>friend <t>familyetc. -
Parameters can be in any order e.g. if the command specifies
<n>NAME <p>PHONE_NUMBER,<p>PHONE_NUMBER <n>NAMEis also acceptable.
3.1. Common commands
3.1.1. Switch to another feature’s tab
There are 4 features in Modulo: Calendar, Cap (i.e. Modules), Quiz and Finance.
Format: switch FEATURE_NAME
Examples: switch quiz, switch calandar, switch cap, switch finance.
3.1.2. Exiting the program
Exits the program.
Format: exit
3.1.3. To seek help
Brings up a link that leads to the user guide online. Thus, internet connection is required.
Format: help
3.2. Calendar
Calendar displays a weekly list of tasks and modules which the user has added. To enter the Calendar section
please enter the command: switch calendar.
3.2.1. Add a new ToDo Task: add
Adds a new ToDoTask to the calendar. This ToDoTask only exist in the week that is currently displayed.
All fields except for TAG are compulsory fields. You could not add a new task if in the current week there already
exists another task with the same title, day, and deadline.
The fields of ToDoTask consist of:
- TaskTitle The name of the task. Prefix: <title>
- TaskDay The time when the user plan to do the task. Prefix: <day>.
- TaskDescription Additional description of the Task. Prefix: <desc>.
- TaskDeadline The date when the task is due in dd-mm-yyyy format. Only valid dates are accepted
(e.g. the date 31-02-2019 does not exist and hence is not accepted). Prefix: <deadline>.
- TaskTime Where time when the task occurs, in HH:mm 24-hour format from 00:00 to 23:59. Prefix: <time>.
- TAG Tag that can be used to sort the tasks. Prefix: <tag>.
More than one TAG can be added to each task, e.g. <tag> High-Priority <tag>Math
Format: add <title>TITLE <day>DAY <desc>DESCRIPTION <deadline>DEADLINE <time>TIME [<tag>TAG]
e.g. add <title>CS2109 Assignment <day>tuesday <desc>Submit code through LumiNUS <deadline>21-10-2019
<time>13:00 <tag>IMPORTANT
| If the calendar list gets too long, you can scroll individual days to see the tasks that are not currently on screen. |
3.2.2. Add a new Module Task: addmod
Adds a new ModuleTask to the calendar. ModuleTask are the same as ToDoTask except it doesn’t need a
deadline and it would be automatically added to each week. ModuleTask is not affected by the command clearweek.
Format: addmod <title>TITLE <day>DAY <desc>DESCRIPTION <time>TIME [<tag>TAG]
e.g. addmod <title>CS2109 Lecture <day>tuesday <desc>Submit code through LumiNUS <time>13:00
3.2.3. Edit existing task: edit
Edit one or multiple fields of an existing task. INDEX should be a positive integer and a task with the number INDEX
should already exist on the current week’s calendar. Editing the deadline is only available for ToDoTask.
Format: edit INDEX <title>TITLE <day>DAY <desc>DESCRIPTION <deadline>DEADLINE <time>TIME <tag>TAG
e.g. edit 1 <title>CS2108 Assignment <day>friday
3.2.4. Delete existing task: delete
Delete an existing task. INDEX should be a positive integer and a task with the number INDEX
should already exist on the current week’s calendar.
Format: delete INDEX
e.g. delete 1
3.2.5. Listing all tasks : list
Shows a list of all task in the calendar.
Format: list
3.2.6. Sort tasks: sort
Sort the tasks according to the specified SORT_TYPE.
There are three SORT_TYPE:
- sort time will sort the tasks according to the their time in ascending order
- sort deadline will sort the tasks according to their deadline in ascending order
- sort title will sort the tasks according to their title in ascending alphabetical order
When the application is launched for the first time, the tasks are sorted according to time. Subsequently, it will
use the sorting type that is last used in the previous session.
Format: sort SORT_TYPE
e.g. sort deadline
3.2.7. Change week: go
Go to the specified week WEEK_NUMBER. The WEEK_NUMBER must between 0 to 14 inclusive. The default week is week 0 and
would be shown every time the application is launched.
Format: go WEEK_NUMBER
e.g. go 2
3.3. Grades Tracker
To enter the Module section please enter the command: switch cap
| Available Commands | Prefixes / Input required | Use |
|---|---|---|
add |
<m> MODULE_CODE, <t>TITLE, <s> SEMESTER, <c> CREDIT <g> GRADE |
Adds a new module. |
delete |
MODULE_CODE |
Deletes a specific module. |
list |
List all the modules, often required after the find command. |
|
find |
KEYWORD |
Find a specific keyword within module code and/or module description. |
sort |
Display the modules in order of their semesters and academic years taken. |
|
clear |
Clear all existing modules. |
3.3.1. Manually add module to record : add
The user can add new modules into the grade tracker.
The fields of a module consist of:
- MODULE_CODE The module code of the module. e.g. CS2103 Prefix: <m>
- TITLE The title of the module. E.g. Software Engineering Prefix: <t>.
- SEMESTER Semester includes 2 components that are seperated by a 'S' character. i.e. the academic year and semester period. E.g. 1920S1 Prefix: <s>.
- CREDIT Modular credit for the module. Module credit only accepts 2 to 23 credits. E.g. 4 Prefix: <c>.
- GRADE Grades for the attained for the module. Only permitted grades are accepted. E.g. A Prefix: <g>.
| Field | Validity |
|---|---|
ModuleCode |
Module code should contain a set of 4 integers and no excessive characters. |
Semester |
Semester should contain valid academic years and semester period. The academic year stated can only be +/-5 years than the current year. While the semester period allows input from 1 to 4. |
Title |
The title of the module is left for you to define. It is valid as long as it does not have special characters. |
Credit |
As stated by NUS, the range of modular credit ranges from 2 to 23. |
Grade |
Only NUS approved grades are allowed i.e. A+, A, A-, B+, B, B-, C+, C, D+, D and F |
| Input | Semester Period |
|---|---|
1 |
Semester 1 |
2 |
Semester 1 |
3 |
Special Term 1 |
4 |
Special Term 2 |
Format: add MODULE_CODE MODULE_TITLE MODULE_YEAR_AND_SEMESTER MODULAR_CREDIT GRADE
E.g. add <m>CS2103 <t>Software Engineering <s>1920S1 <c>4 <g>A, add <m>ACC1002 <t>Financial Accounting <s>1920S1 <c>4 <g>A
| Module | Command |
|---|---|
CS2103 |
add <m>CS2103 <t>Software Engineering <s>1920S1 <c>4 <g>A |
EC3343 |
add <m>CS3343 <t>International Finance I <s>2021S1 <c>4 <g>A |
CS3202 |
add <m>CS3202 <t>Software Engineering Project II <s>2021S2 <c>4 <g>B+ |
CS3211 |
add <m>CS3211 <t>Parallel and Concurrent Programming <s>2021S2 <c>4 <g>A- |
CS3218 |
add <m>CS3218 <t>Multimodal Processing in Mobile Platforms <s>2122S1 <c>4 <g>B |
3.3.2. Delete module from record : delete
Delete a specific module from the list of modules by specifying the module code. The command is very strict on matching the module code given to the existing modules in modulo.
Format: delete MODULE CODE
e.g. delete CS2103
3.3.3. Listing all tasks : list
Shows the list of all modules in the Grades Tracker.
Format: list
3.3.4. Sort all tasks in chronological order : sort
Sorts the list of modules in chronological order, the modules taken earlier to the modules taken later. The determination is based on the academic year then the semesters.
Format: sort
3.3.5. Locating module by module code or title : find
Finds the module with the matching module code or module description.
The enhanced search is case insensitive and matches any keyword in the module code or description e.g. cs1010s matches CS1010S
The search method adopts the inclusive OR search method that returns any modules with the keyword.
e.g. searching for prog metho will return Programming Methodology I and Programming Methodology II.
Format: find KEYWORD
e.g. find CS1010S, find Programming
3.3.6. Clear all modules the record : clear
Deletes all modules in the record. The user can avoid clearing modules one-by-one when large number of modules have to be cleared.
When the single keyword clear is entered, Modulo would recognise it as a command to clear all the modules. The action is irreversible!
Format: clear
e.g. clear
3.3.7. Categorisation [Coming in V2.0]
Categorisation of the modules in their respective semesters and predictive text.
3.4. Quiz
To enter the Quiz section please enter the command: switch quiz
Note on pre-populated data: The pre-populated data are used to help you to get the picture of how
quiz show the data. You can use the command clear or go to 3.4.12 section to clear the given data.
Note on UI: Modulo quiz uses dark theme to prevent users from straining their eyes by staring at
their computer window too long. You can adjust the size of the split pane by sliding the window separator
between the two windows to fully see the whole question. Go to 3.4.6 section to fully see the
question properly.
3.4.1. Add the details of the quiz question:
Users can add new quiz questions with the details in it. The details of the question should be added with the following requirements.
The keyword instructions of the question include:
- <qns> Indicate that the next several phrases will be the name of the question.
- <ans> Indicate that the next several phrases will be the answer to the question.
- <cat> Indicate that the next several phrases will be the category of the question.
- <type> Indicate that the next several phrases will be the priority/importance level of the question.
- <tag> Indicate that the next several phrases will be the customized tag of the question.
The details instructions after the keyword of the question:
- <qns> are required. The character limit is 200 and minimum 3 letters.
- <ans> are required. The character limit is 125.
- <cat> are required. The character limit is 50.
- <type> are required. The format after this command should only be: high, normal, low.
- <tag> are optional. To add numerous tags, please prepend <tag> keyword to differentiate one tag from another.
Note: Two questions are the same if they have the same <qns>, <ans> and <cat>
Format: add <qns> your_question <ans> your_answer <cat> your_category <type> your_priority
<tag> your_tag
Example 1:
add <qns> What is always coming, but never arrives? <ans> Tomorrow <cat> CS2131 <type> high <tag> lecture <tag> tutorial
Example 2:
add <qns> What can one catch that is not thrown? <type> normal <ans> A cold <cat> CS2131
-
Remark (please avoid this):
add <qns> What is <qns>always comi<qns>ng, but never arrives? <ans> Tom<ans>orrow
3.4.2. Delete question from record:
Delete a specific quiz question from the group questions.
Format: delete [NUMBER]
Usage: [NUMBER] is the index/row from that category that you want to delete.
Example 1:
delete 1
3.4.3. Edit details of a question : edit
Specify which question you want to edit and modify it from the question list.
The details/instructions of the new questions include:
- <qns> Indicate that the next several phrases will be the name of the question.
- <ans> Indicate that the next several phrases will be the answer to the question.
- <cat> Indicate that the next several phrases will be the category of the question.
- <type> Indicate that the next several phrases will be the priority/importance level of the question.
- <tag> Indicate that the next several phrases will be the customized tag of the question.
Note that at least one of the following must be modified and replaced:
- <qns> character limit is 200. No minimum letter.
- <ans> character limit is 125. No minimum letter.
- <cat> character limit is 50.
- <type> format after this command should only be: high, normal, low.
- <tag> are optional. To add numerous tags, please prepend <tag> keyword to differentiate one tag from another.
Format: edit [NUMBER] <qns> your_new_question <ans> your_new_answer <cat> your_new_category
<type> your_new_priority <tag> your_tag
Usage: [NUMBER] is the index/row from that category that you want to edit.
Example 1:
edit 1 <qns> How many mammals are there in the universe? <type> low
-
Remark (Please avoid this):
edit 1 <qns> What is <qns>always comi<qns>ng, but never arrives? <ans> Tom<ans>orrow
3.4.5. Find the quiz questions with keyword:
Find the quiz questions from the list of questions.
Format: find [INSTRUCTION] <key>[KEYWORDS]
Note: The [KEYWORDS] is the list of keywords that I want to search.
The expected details/instructions for [INSTRUCTION] keyword are:
- question - Indicate that I want to include the name of the question in my search.
- answer - Indicate that I want to include the answer to the question in my search.
- category - Indicate that I want to include the category of the question in my search.
- type - Indicate that I want to include the priority/importance level of the question in my search.
- tag - Indicate that I want to include the customized tag of the question in my search.
Note:
• To search for everything, leave the [INSTRUCTION] field blank.
• To include multiple instructions to be searchable or to search for multiple keywords, you can split it with a comma ,
• To enable friendlier syntax [KEYWORDS] when searching your desired questions, add -i after your find command.
Example 1: find <key> CS2131, lecture
Explanation: search for CS2131 and lecture keyword from the whole question
Example 2: find category, answer <key> Tomorrow
Explanation: search from the category and answer portion of each question that matches keyword Tomorrow
Example 3: find -i answer <key> Tomrrow
Explanation: search from the answer portion of each question that matches keyword that is similar to Tomrrow
3.4.6. Details of a selected question:
Show the details of a selected question. This details will show the whole questions that is truncated from the preview window and reveal the comment/explanation from the selected question.
Format: detail [INDEX]
Usage: [INDEX] is the index/row from the question that you want to see.
Example: detail 1
3.4.7. Add Comment of a question:
Users can add a comment/explanation of a particular questions.
Format: comment [INDEX] <val> your_comment
Usage: [INDEX] is the index/row from the question that you want to comment.
Example: comment 1 <val> The explanation is in pg 194 textbook.
3.4.8. Hide answer of a question:
Users can hide all question answers when they want to revise or for other purposes. It also provide the user the hint of the answer. By default the answer is shown.
Format: showAnswer [yes/no]
Example: showAnswer no
3.4.9. Undo:
Undo some of the previous action.
Action that is undoable include: add, edit, delete, clear, comment
Format: undo
3.4.10. Redo:
Redo some of the previous action.
Action that is redo-able include: add, edit, delete, clear, comment
Format: redo
3.4.11. Clear all data:
To remove all of the current data in quiz book.
Format: clear
3.4.12. Help:
Format : help
3.4.13. Exit application:
To exit application (Modulo).
Format: exit
3.5. Finances
To enter the Finances section, please enter the command: switch finance
All amounts are taken to be in SGD and recorded as if with dollar signs and numerals. For example, 110 cents should be written as 1.10 or 1.1.
If dates are to be specified, only dates of format DD-MM-YYYY will be recognised. If dates are not specified, the default day will be set to the current day when the entry was entered. Dates should not be in the future.
Note that category names should be without whitespaces (e.g. catFood, not cat food).
3.5.1. Add an entry of expenditure: spend
Record down an entry of spending with relevant information associated with it. If place of spending is not specified, it will default to -.
Format: spend <amt>AMOUNT <item>DESCRIPTION <met>TRANSACTION_METHOD [<place>PLACE] [<day>TRANSACTION_DATE] [<cat>CATEGORY]…
e.g. spend <amt>2.80 <day>15-10-2019 <item>Yong Tau Foo <met>Cash <place>Frontier
3.5.2. Add an entry of income: income
Record down an entry of incoming money. Source of income should be specified.
Format: income <amt>AMOUNT <item>DESCRIPTION <met>TRANSACTION_METHOD <from>SOURCE_OF_INCOME [<day>TRANSACTION_DATE] [<cat>CATEGORY]…
e.g. income <amt>300 <day>09-08-2019 <item>GST Voucher <met>Bank credit <from>Govt
3.5.3. Add an entry of borrowed money: borrow
Record down an entry of money borrowed from someone but not yet repaid.
Format: borrow <amt>AMOUNT <item>DESCRIPTION <met>TRANSACTION_METHOD <from>PERSON_BORROWED_FROM [<day>DATE_BORROWED] [<cat>CATEGORY]…
e.g. borrow <amt>2 <day>09-08-2019 <item>Dilys egg tarts <met>Cash <from>Classmate
3.5.4. Add an entry of lent money: lend
Record down an entry of money lent to someone but not yet repaid.
Format: lend <amt>AMOUNT <item>DESCRIPTION <met>TRANSACTION_METHOD <to>PERSON_LENT_TO [<day>DATE_LENT] [<cat>CATEGORY]…
e.g. lend <amt>1 <day>08-08-2019 <item>HL Choco milk <met>Cash <to>Brother
3.5.5. Mark a Borrow or Lend entry as repaid: repaid
Indicate that borrowed money or money lent has been returned. Note that index of log entry in list has to be of type 'borrow' or 'lend' to be successfully marked as repaid, all other log entries (i.e. 'spend', 'income') will be considered invalid.
Once the log entry has been marked as repaid, it cannot be undone and it is no longer editable.
The recorded day of when the entry was repaid is the day the entry was marked as so.
Format: repaid INDEX
e.g. repaid 4
3.5.6. Clone a log entry: clone
Duplicate a log entry, with the same information except for the date of transaction. The date of transaction will be the day the entry was cloned.
Format: clone INDEX
e.g. clone 3
3.5.7. List out finances: list
List out all entries in recorded down. All entries will be ordered chronologically, with the latest entry at the top (i.e. indexed 1).
Format: list
3.5.8. Edit an entry: edit
Edit an entry previously entered by index of entry in listed listed out by list. Index provided should be valid, within range of the list and positive. There is not need to re-enter all details of the log entry to edit it - just specify the field to be edited. Any irrelevant fields to the log entry (e.g. 'Borrow' entries do not have a <place> field) will be ignored.
Note that the newly-entered information will overwrite the details at the attribute. For example, if there were categories food and hobby linked to the entry at index 5 of the list, command edit 5 <cat>pet will delete the previous two categories and replace them with a single category pet.
Repaid 'Borrow' and 'Lend' entries cannot be edited.
Format: edit INDEX [<amt>AMOUNT] [<day>DAY] [<item>DESCRIPTION] [<met>TRANSACTION_METHOD] [<cat>CATEGORY ]
* Additional field available for 'Spend' entries: [<place>PLACE]
* Additional field available for 'Income' and 'Borrow' entries: [<from>SOURCE/PERSON_BORROWED_FROM]
* Additonal field available for 'Lend' entries: [<to>PERSON_LENT_TO]
e.g. edit 1 <day>12-02-2019 <cat>Gift
3.5.9. Delete entry/entries: delete
Delete an entry by its index in the list.
Format: delete INDEX
e.g. delete 5
3.5.10. Search and filter list of log entries: find
Search through the list of log entries by keyword. This will search through every entry’s item description, place (for 'Spend' entries), transaction method, source of income (for 'Income' entries), person borrowed from (for 'Borrow' entries) and person lent to (for 'Lend' entries). Note that only item description will allow for partial word matching (i.e. cook in cookie is valid), the rest will search for a full word match. This search is case-insensitive.
Filter the list of log entries by their log entry type (i.e. spend, income, borrow, lend).
At least one field has to be specified.
To return to the default full list of log entries, use the list command.
Format: find [<type> spend/income/borrow/lend] [<keyword> KEYWORD [MORE_KEYWORDS]…] [<cat> CATEGORY_NAME [MORE_CATEGORY_NAMES]…]
E.g. find <type>spend
3.5.11. Show statistical summaries of finances: stats
Shows an overview of the state of expenses and incomes. Log entries can be grouped by (<gb>) a specified attribute with either the frequency or total amount of each group summarised (<sum>) in a graphical display. These attributes include log entries of the same month, type, transaction method, category or place.
Both <gb> and <sum> have to be present, with combination of ATTRIBUTE and STAT specified.
Format: stats <gb>ATTRIBUTE <sum>STAT
* Possible ATTRIBUTE values for <gb> are: month, entrytype, met, cat, place (only shows Spend entries)
* Possible STAT values for <sum> are: freq and amt
E.g. stats <gb> met <sum> freq
3.5.12. Add a budget: budget
Specify a budget. Budgets will only take into account the amount spent (i.e. Spend entries) and are generally characterised by a starting date, an ending date and a limit (maximum threshold). When total amount associated with spending crosses this limit, the budget is considered to be exceeded.
Budgets for a specific place, category or transaction method can also be set (optional). Only at most one field out of these 3 optional fields - <met>, <cat>, <place> - can be included to make the budget more specific. If a spend entry matches the specified field and also falls within the budget duration, it will be included in the budget tabulation. If none of these fields are indicated, the budget will sum up the amounts of all Spend entries which fall between the budget duration.
In essence, there are 3 optional fields (only at most one can be used at any time):
-
[<met>TRANSACTION_METHOD] -
[<cat>CATEGORY_NAME] -
[<place>PLACE_OF_SPENDING]
Note that these fields are case-sensitive (e.g. Spend entries with category food will not match if budget field is specified as <cat> FOOD).
There are 3 ways to specify the duration (start, end) of a budget:
-
<start>START_DATE <end>END_DATE
-
<start>START_DATE <dur>DURATION_IN_DAYS
-
<month>MM-YYYY
Example Format 1: budget <amt>AMOUNT <start>START_DATE <end>END_DATE [<met>TRANSACTION_METHOD]
Example Format 2: budget <amt>AMOUNT <start>START_DATE <dur>DURATION_IN_DAYS [<cat>CATEGORY_NAME]
Example Format 3: budget <amt>AMOUNT <month>MM-YYYY [<place>PLACE_OF_SPENDING]
e.g. budget <amt> 300 <month>11-2019 <met>cash
3.5.13. List out all budgets: listb
List out all budgets which have been recorded down.
Format: listb
3.6. Saving the data
Modulo data are saved in the hard disk automatically after any command that changes the data.
There is no need to save manually.
4. FAQ
Q: How do I transfer my data to another Computer?
A: Install the app in the other computer and overwrite the empty data file it creates with the file that contains the data of your previous Modulo folder.
We have enjoyed budilding Modulo and we hope you have enjoyed Modulo like we do! We look forward to seeing you again in V2.0! May you get good grades!