By: AY1920S1-CS2103-T16-2 Since: September 2019 Licence: MIT
1. Setting up
Refer to the guide here.
2. Design
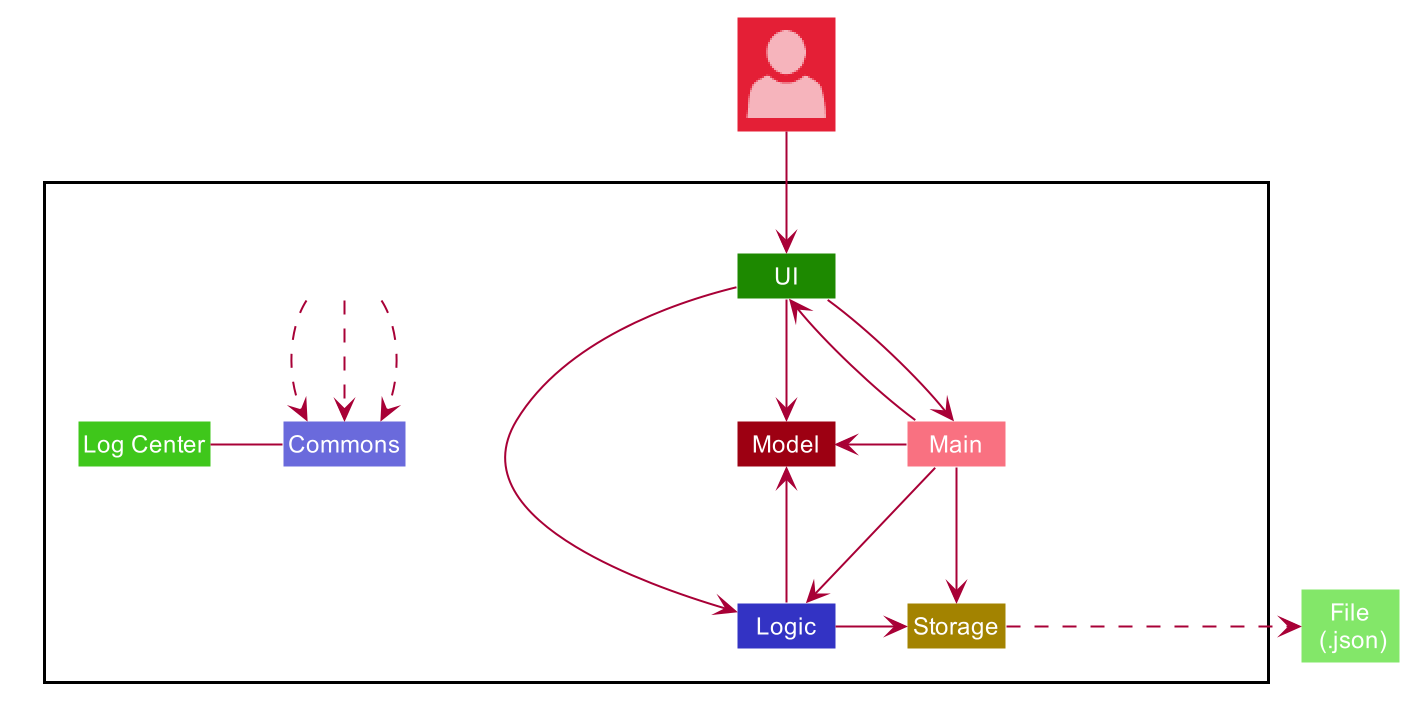
2.1. Architecture
-
At app launch: Initializes the components in the correct sequence, and connects them up with each other.
-
At shut down: Shuts down the components and invokes cleanup method where necessary.
Commons represents a collection of classes used by multiple other components.
The following class plays an important role at the architecture level:
-
LogsCenter: Used by many classes to write log messages to the App’s log file.
The rest of the App covers the four features in Modulo (Calendar, Cap, Quiz, Finance). All the features have the very similar structure, each consisting of four components.
Each of the four components
-
Defines its API in an
interfacewith the same name as the Component. -
Exposes its functionality using a
{Component Name}Managerclass.
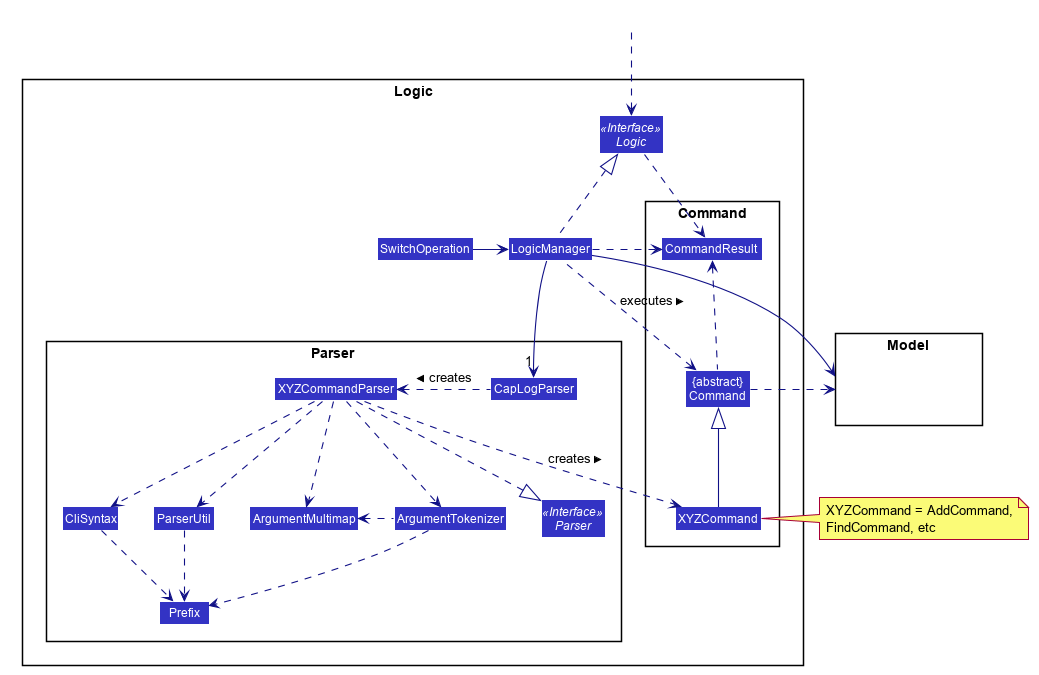
For example, the Logic component (see the class diagram given below) defines it’s API in the Logic.java interface and exposes its functionality using the LogicManager.java class.
Rationale for having multiple UI, Logic, Model, Storage classes in Modulo
The features in Modulo are quite distinct and having minimal overlaps, each feature has its own data file to read and modify. The logic to execute commands are also handled differently in each feature. As such, our decision to have 4 components for each feature was to reduce coupling and allow flexibility in our implementations. This means that the same add command is now able to trigger a different sequence of actions depending on the feature the user is currently in. This architecture style allows each feature to be developed independently, free from the constraints set by other features. Each time a user switches to another feature, the Ui, Logic, Model and Storage classes will be replaced by that of the new feature.
How the architecture components interact with each other
The Sequence Diagram below shows how the components interact with each other for the scenario where the user issues the command delete CS2103 when in the feature Module.
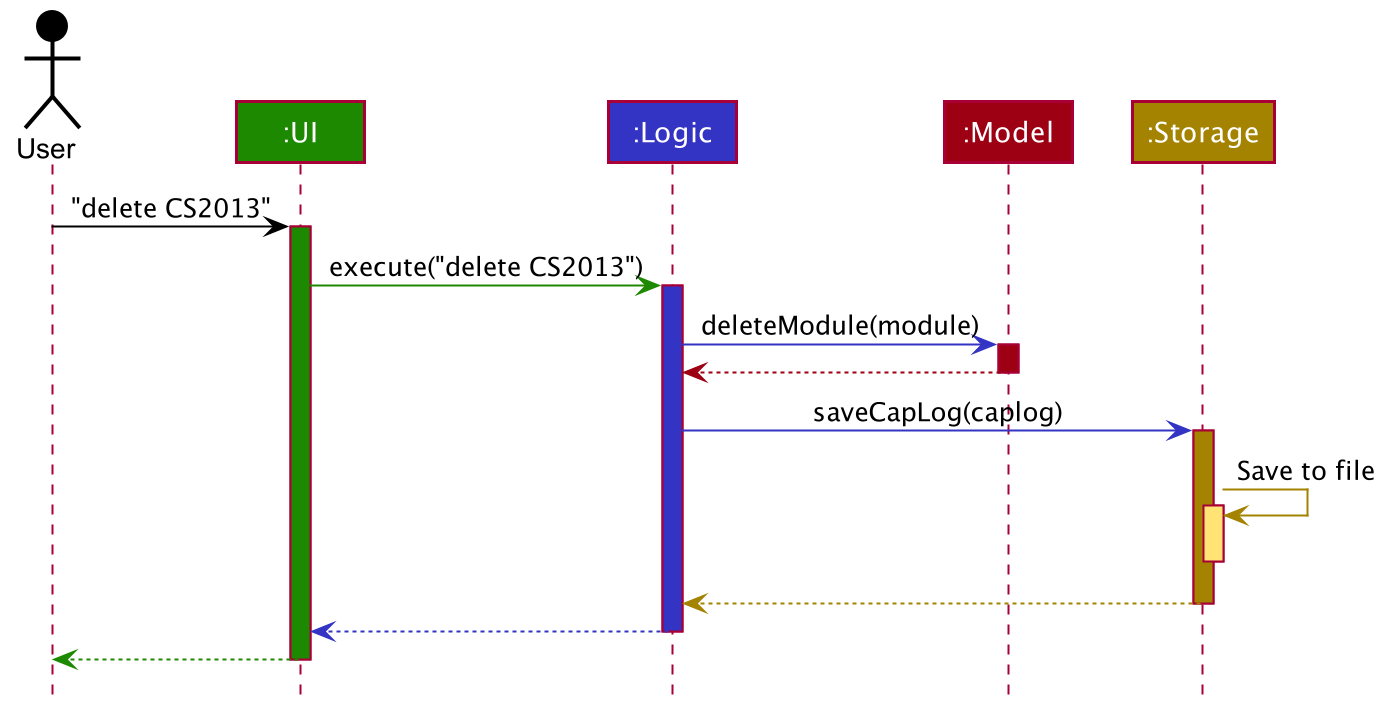
delete CS2103 command in Cap featureThe sections below give more details of each component.
2.2. UI component

The UI consists of a MainWindow that is made up of parts e.g.CommandBox, ResultDisplay, XYZListPanel, StatusBarFooter etc. All these, including the MainWindow, inherit from the abstract UiPart class. Each feature in Modulo (represented generically in the class diagram with XYZ) has their own UI component, largely with the same structure but mainly differing in classes XYZPanel and XYZCard to better present the information associated with the feature.
The UI component uses JavaFx UI framework. The layout of these UI parts are defined in matching .fxml files that are in the src/main/resources/view folder. For example, the layout of the MainWindow is specified in MainWindow.fxml
The UI component,
-
Executes user commands using the
Logiccomponent. -
Listens for changes to
Modeldata so that the UI can be updated with the modified data.
2.3. Logic component
The example below is in the context of the feature Cap but all four features in Modulo have the same structure for their Logic components.
-
Logicuses theCapLogParserclass to parse the user command. -
This results in a
Commandobject which is executed by theLogicManager. -
The command execution can affect the
Model(e.g. adding a person). -
The result of the command execution is encapsulated as a
CommandResultobject which is passed back to theUi. -
In addition, the
CommandResultobject can also instruct theUito perform certain actions, such as displaying help to the user.
Given below is the Sequence Diagram for interactions within the Logic component for the execute("delete 1") API call, in the context of another feature of the APP, Calendar.
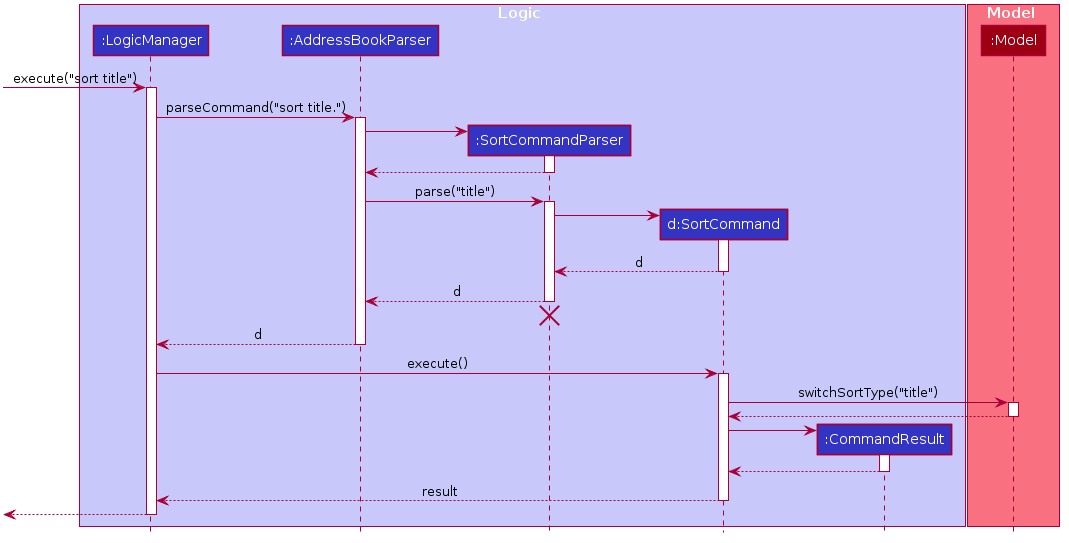
sort title Command for the feature Calendar
The lifeline for SortCommandParser should end at the destroy marker (X) but due to a limitation of PlantUML, the lifeline reaches the end of diagram.
|
2.4. Model component
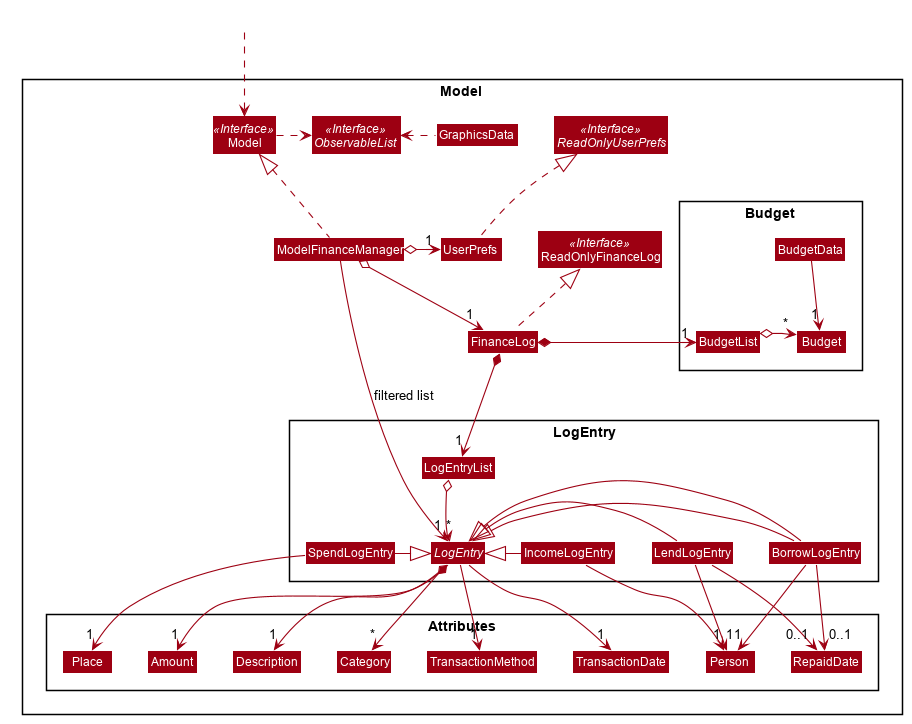
Due to the different nature and behaviour of each feature in Modulo dealing with different kinds of information (e.g. tasks, modules, quiz questions, finance logs etc), Model components between the feature can look very different. However, they do share some similar structures as mentioned below.
The Model,
-
stores a
UserPrefobject that represents the user’s preferences. -
stores the data for the feature (e.g. Calendar Data, Cap Module Log, Quiz book, Finance Log).
-
exposes an unmodifiable
ObservableList<{Object used in Feature}>that can be 'observed' e.g. the UI can be bound to this list so that the UI automatically updates when the data in the list change. -
does not depend on any of the other three components.
2.5. Storage component
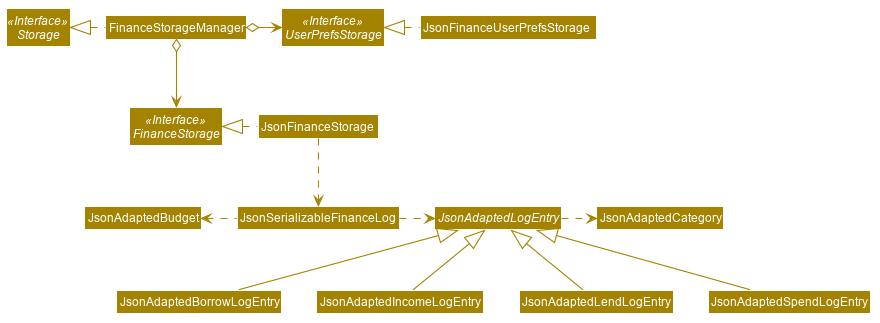
The Storage component,
-
can save
UserPrefobjects in json format and read it back. -
can save the data used in each feature in json format and read it back.
2.6. Common classes
Classes used by multiple components are in the seedu.addressbook.commons package.
3. Implementation
This section describes some noteworthy details on how certain features are implemented.
3.1. Logging
We are using java.util.logging package for logging. The LogsCenter class is used to manage the logging levels and logging destinations.
-
The logging level can be controlled using the
logLevelsetting in the configuration file (See Section 3, “Implementation”) -
The
Loggerfor a class can be obtained usingLogsCenter.getLogger(Class)which will log messages according to the specified logging level -
Currently log messages are output through:
Consoleand to a.logfile.
Logging Levels
-
SEVERE: Critical problem detected which may possibly cause the termination of the application -
WARNING: Can continue, but with caution -
INFO: Information showing the noteworthy actions by the App -
FINE: Details that is not usually noteworthy but may be useful in debugging e.g. print the actual list instead of just its size
3.2. Configuration
Certain properties of the application can be controlled (e.g user prefs file location, logging level) through the configuration file (default: config.json).
3.3. Calendar
3.3.1. Calendar week change
Implementation

Calendar week change is done by removing all tasks from the calendar and adding all the tasks that either have the new
corresponding week number or is an instance of ModuleTask.
Design Considerations
Aspect: How go WEEK_NUMBER executes
-
Alternative 1 (current choice): Save all data in a single json file.
-
Pros: No need to switch storage file.
-
Cons: Unnecessary reading of data from other weeks. Need to add filter to get only the relevant data.
-
-
Alternative 2: Read and load for each week from separate json storage file.
-
Pros: Easy to clear data from a certain week.
-
Cons: Need to switch storage file each time the user go to the next/previous week.
-
3.3.2. Persistent ModuleTask
Implementation
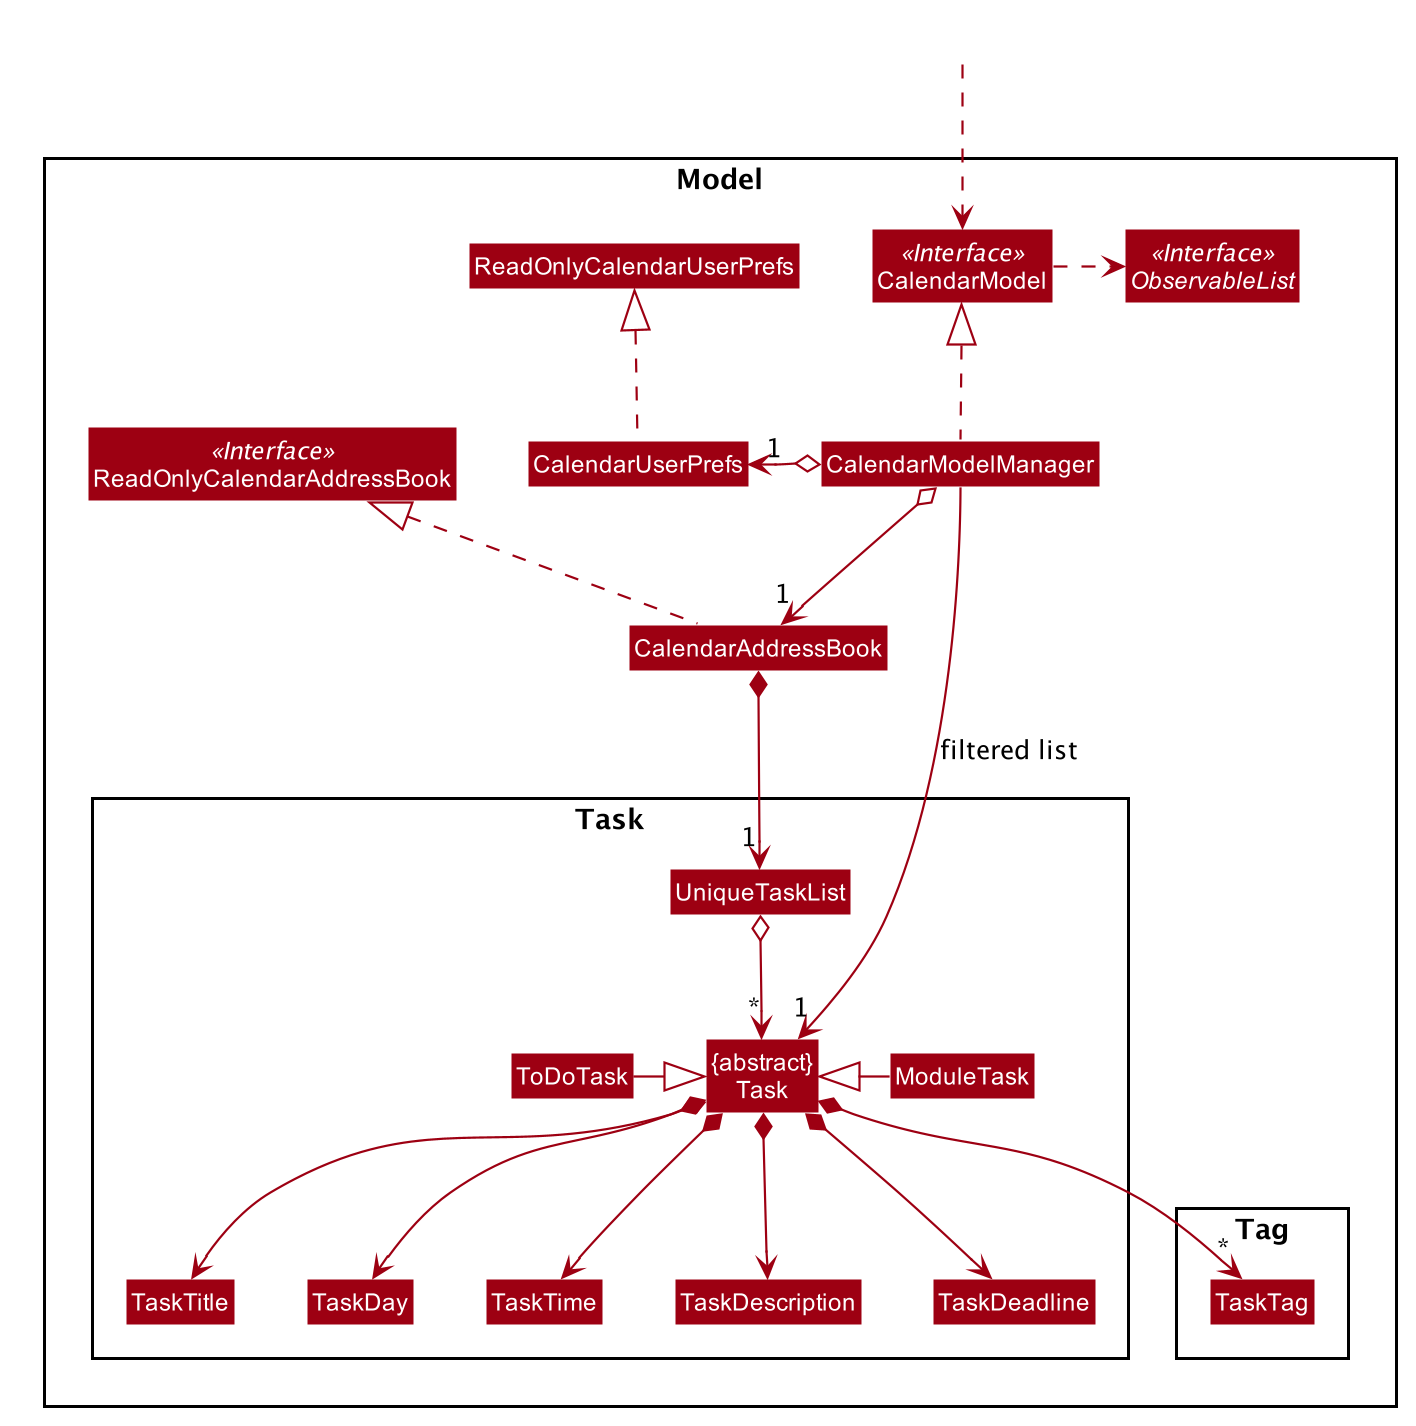
The abstract class Task has two subclasses: ToDoTask and ModuleTask. ToDoTask only exists in its corresponding
week while ModuleTask is persistent. When a ModuleTask is added to any arbitrary week, it would be automatically
added to all of the other weeks and when a certain week is cleared using the clearweek command, it would not affect
the ModuleTask. Hence, ModuleTask can only be deleted by using the command clear or deleting each ModuleTask
manually using delete.
Design consideration
-
Alternative 1 (current choice): Create separate classes for
ToDoTaskandModuleTaskthat both inherits from the abstract classTask. User use different commandaddandaddmodto create the corresponding subclass.-
Pros: Code looks cleaner. Easier to implement a different UI for each subclass.
-
Cons: More code.
-
-
Alternative 2: Use a non-abstract class
Taskfor both ToDos and Modules and add a boolean fieldisPersistent.-
Pros: No need to add new classes.
-
Cons: User needs to input an extra field
<persist> [TRUE/FALSE]. It is more difficult to differentiate the type ofTaskwhen reading the code.
-
3.3.3. Sorting
Implementation
Task can be sorted according to TaskTitle, TaskDeadline, or TaskTime. Each type of sorting has its own
comparator implemented in a method that would return a sorted FilteredList<Task>.
Design consideration
-
Alternative 1 (current choice): Use an external comparator.
-
Pros: Easy to switch between different sort type.
-
Cons: Need to call the sort method each time the calendar is updated.
-
-
Alternative 2: Set the
Taskclass to implement theComparableinterface.-
Pros: Need to switch the
compareTo()method of eachTaskeach timesortis called. -
Cons: New/edited task would be automatically placed at the correct order.
-
3.4. Quiz feature
3.4.1. Create question feature
Implementation
To use this feature, the user will need to switch to the quiz mode and add the question they want with several requirements on the syntax stated in the UserGuide. Modulo quiz uses dark theme because we don’t want users to strain their eyes from staring at their computer window too long.
Below are the quiz model class diagram:
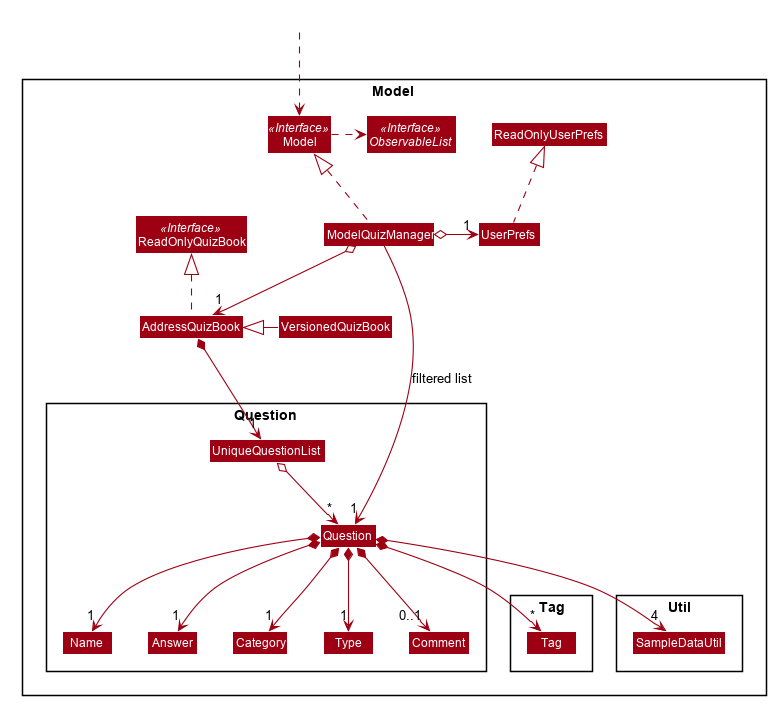
In quiz feature, a Question has 6 attributes namely: Name, Answer, Category, Type, Comment, Tag, with
the first three attributes differentiate one Question from the others. When the users first time launch the app or there are no data yet,
Modulo will automatically populate the four questions from SampleDataUtil. The users are able to use the clear command
if they want to delete the given data entirely. UI will then pull and updates the data from the ModelQuizManager which
represents the in-memory model of the AddressQuizBook data, and show them to the users.
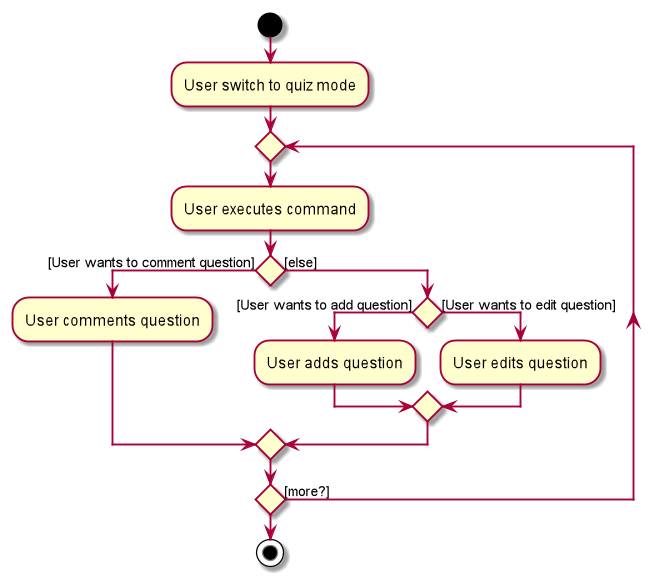
Given below is an example usage scenario on how to add a question properly and the mechanism that behaves at each step.
Step 1. The user launches the application and switch to the quiz mode by executing switch quiz.
Step 2. The user executes add <qns> What is always coming, but never arrives? <ans> Today <cat> CS2131 <type> high
command to add a question with the question name: What is always coming, but never arrives? and answer: Tomorrow, category: CS2131, type: high in the quiz book.
The add command calls Model#addQuestion(), causing the modified state of the quiz book, after the command executes, to be saved in the quizBookStateList and shown in the UI.
Step 3. If the user realized that they have typed the wrong answer for a particular question, then the user can executes
edit 1 <ans> Tomorrow command to replace the previous answer with the new answer with the given index prepend behind. The edit command calls Model#setQuestion(),
causing the modified state of the quiz book, after the command executes, to be saved in the quizBookStateList and updated in the UI.
Step 4. [Addtional] The user can execute comment 1 <val> The explanation is in pg 194 textbook if he/she now decide to add a comment or explanation of a quiz question at index 1.
The comment command calls Model#setQuestion() to parse in an additional parameter of comment into the entity of the question. It will then be saved in the
quizBookStateList and shown in the UI.
| Users can also utilize the undo/redo command when they realize that they have execute a command that they shouldn’t do (Will be explained in [3.4.2]). |
The following activity diagram summarizes the basic question creation process:
Design Considerations
Aspect: How to add question
-
Alternative 1 (current choice): Users add question to the last of the list.
-
Pros: Easy to implement and fast (Insertion O(1)).
-
Cons: User may not be able to position the question from the list of questions.
-
-
Alternative 2: Users insert the question to the desired position.
-
Pros: User can order the list as they desired and remember things better.
-
Cons: Not as fast as the insertion at the back of the list from alternative 1.
-
3.4.2. Undo/Redo feature
Implementation
The undo/redo mechanism is facilitated by VersionedQuizBook.
It extends QuizBook with an undo/redo history, stored internally as an quizBookStateList and currentStatePointer.
Additionally, it implements the following operations:
-
VersionedQuizBook#commit()— Saves the current quiz book state in its history. -
VersionedQuizBook#undo()— Restores the previous quiz book state from its history. -
VersionedQuizBook#redo()— Restores a previously undone quiz book state from its history.
These operations are exposed in the Model interface as Model#commitQuizBook(), Model#undoQuizBook() and Model#redoQuizBook() respectively.
Below is an example usage scenario on how the undo/redo mechanism behaves at each step.
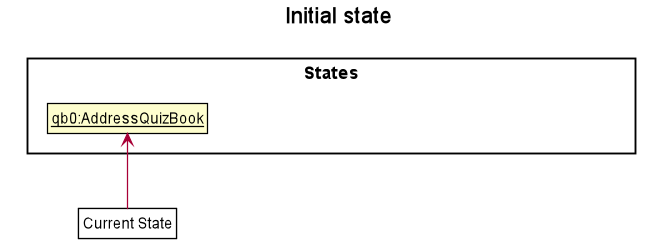
Step 1. The user launches the application for the first time. The VersionedQuizBook will be initialized with the initial quiz book state, and the currentStatePointer pointing to that single quiz book state.
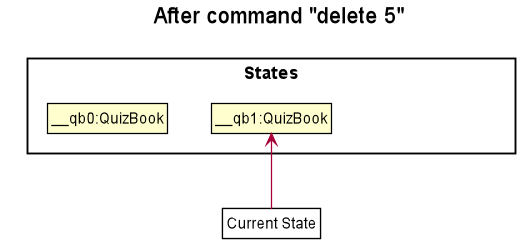
Step 2. The user executes delete 5 command to delete the 5th question in the quiz book. The delete command calls Model#commitQuizBook(), causing the modified state of the quiz book after the delete 5 command executes to be saved in the quizBookStateList, and the currentStatePointer is shifted to the newly inserted quiz book state.
Step 3. The user executes comment 1 <val> NewComment to add a new question. The add command also calls Model#commitQuizBook(), causing another modified quiz book state to be saved into the quizBookStateList.
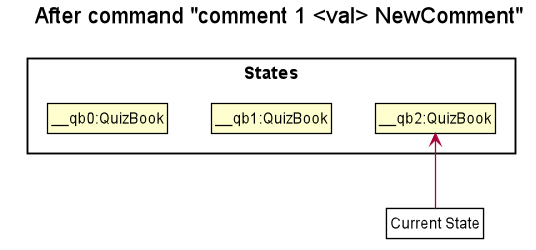
If a command fails its execution, it will not call Model#commitQuizBook(), so the quiz book state will not be saved into the quizBookStateList.
|
Step 4. The user now decides that adding the question was a mistake, and decides to undo that action by executing the undo command. The undo command will call Model#undoQuizBook(), which will shift the currentStatePointer once to the left, pointing it to the previous quiz book state, and restores the quiz book to that state.

If the currentStatePointer is at index 0, pointing to the initial quiz book state, then there are no previous quiz book states to restore. The undo command uses Model#canUndoQuizBook() to check if this is the case. If so, it will return an error to the user rather than attempting to perform the undo.
|
The following sequence diagram shows how the undo operation works:
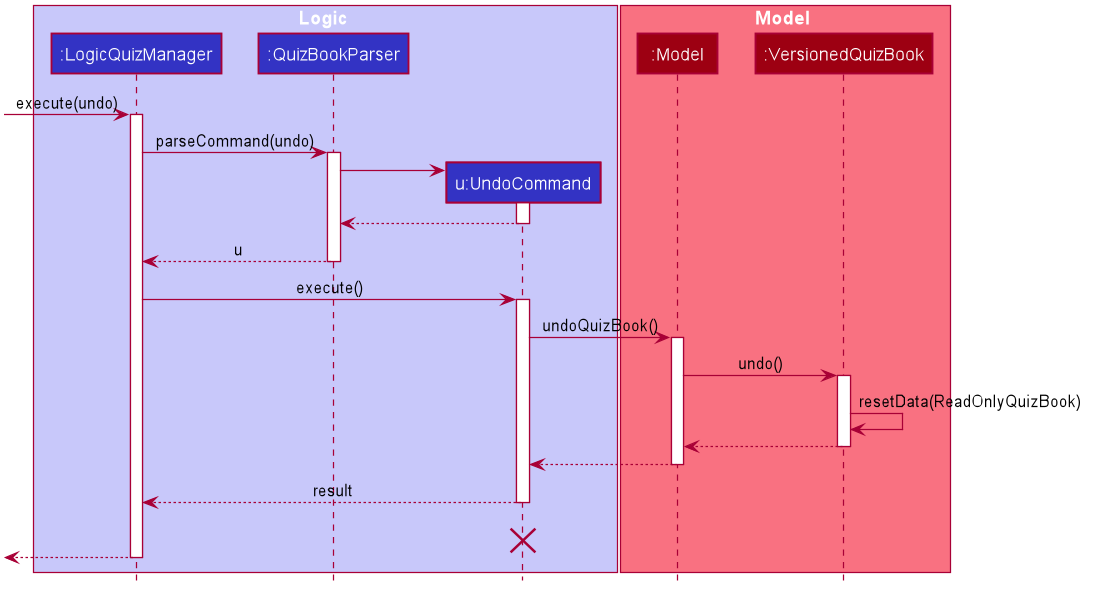
The lifeline for UndoCommand should end at the destroy marker (X) but due to a limitation of PlantUML, the lifeline reaches the end of diagram.
|
The redo command does the opposite — it calls Model#redoQuizBook(), which shifts the currentStatePointer once to the right, pointing to the previously undone state, and restores the quiz book to that state.
If the currentStatePointer is at index quizBookStateList.size() - 1, pointing to the latest quiz book state, then there are no undone quiz book states to restore. The redo command uses Model#canRedoQuizBook() to check if this is the case. If so, it will return an error to the user rather than attempting to perform the redo.
|
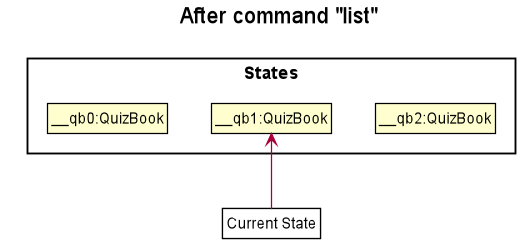
Step 5. The user then decides to execute the command list. Commands that do not modify the quiz book, such as list, will usually not call Model#commitQuizBook(), Model#undoQuizBook() or Model#redoQuizBook(). Thus, the quizBookStateList remains unchanged.
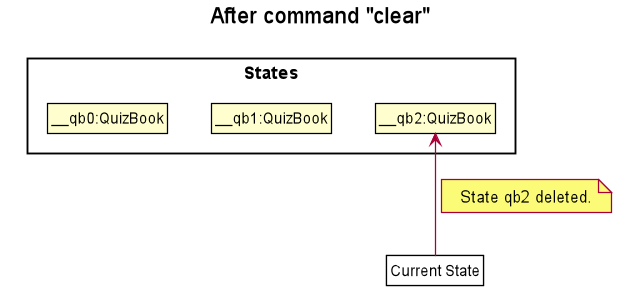
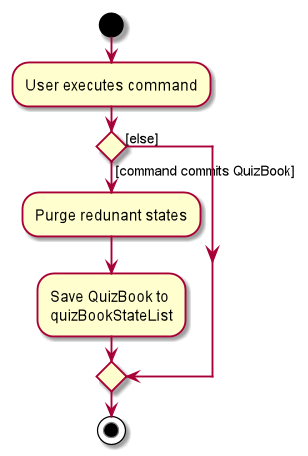
Step 6. The user executes clear, which calls Model#commitQuizBook(). Since the currentStatePointer is not pointing at the end of the quizBookStateList, all quiz book states after the currentStatePointer will be purged. We designed it this way because it no longer makes sense to redo the add n/David … command. This is the behavior that most modern desktop applications follow.
The following activity diagram summarizes what happens when a user executes a new command:
Design Considerations
Aspect: How undo & redo executes
-
Alternative 1 (current choice): Saves the entire quiz book.
-
Pros: Easy to implement.
-
Cons: May have performance issues in terms of memory usage.
-
-
Alternative 2: Individual command knows how to undo/redo by itself.
-
Pros: Will use less memory (e.g. for
delete, just save the question being deleted). -
Cons: We must ensure that the implementation of each individual command are correct.
-
Aspect: Data structure to support the undo/redo commands
-
Alternative 1 (current choice): Use a list to store the history of quiz book states.
-
Pros: Easy for new developers to understand.
-
Cons: May suffer from performance issues on the memory (When a new command is executed, we must remember to update the list from
VersionedQuizBook).
-
-
Alternative 2: Use
HistoryManagerfor undo/redo-
Pros: We do not need to maintain a separate list, and just reuse what is already in the codebase.
-
Cons: Requires dealing with commands that have already been undone: We must remember to skip these commands. Violates Single Responsibility Principle and Separation of Concerns as
HistoryManagernow needs to do two different things.
-
3.5. Budgets in finances
3.5.1. Implementation
A budget is an estimate or threshold of spending set for a specified period of time. In Modulo, a budget can be set to only include spendings of a particular characteristic (i.e. transaction method, place of spending or category). For example, budgets of spendings at a particular place can be set. Modulo will only take into account spendings recorded to be associated with this place and falling within the specified period of time.
To compute the current total amount spent so far and see whether this total amount still falls within the budget, amounts associated with entries are summed together.
These entries have to fulfill the following requirements set by the budget to be considered in the tabulation:
-
Has to be a log entry of type
Spend -
Transaction date has to fall within budget period (i.e. between the start and end dates)
-
(If addition field of transaction method, place of spending or categorys specified) Has to either have the same transaction method, place of spending or be tagged with the same category
There are some classes in the Model component necessary for the computation of budgets:
-
Budget- Contains the basic information about a budget (amount, start and end dates, additional characteristicSpendentry has to fall under (if any)) -
BudgetData- TheBudgetobject associated to it, the limit set by the budget and the current total amount tabulated from theSpendentries matching the budget requirements
In ModelFinanceManager which implements the Model interface, Model#getFilteredBudgetDataList() will return the list of BudgetData objects mapped from the list of Budget objects stored in the Modulo. These BudgetData are instantiated using information from the list of entries stored in Modulo. They filter out entries which do not match the requirements of the budget they are associated with, and then add up all the amounts of the entries to obtain the current total amount spent.
If the total amount of spending is close to exceeding the budget (more than or equals to 80% of budget spent), an orange label at the menu bar will be shown to notify the user that a budget is near to reaching its limit.
And if the total amount of spending has exceeding the limit set by the budget, the menu bar will have a red label indicating that the budget has been exceeded. The amount of money spend has gone over the estimate set and is now in deficit.
Given below is an example usage scenario for what happens when a budget is set, and how Modulo behaves at each step.
This assumes that the user has not set any budget in the application before but has some entries recorded in the finance log. These entries are:
-
(Income) Amount: 800, Item: Internship Pay, From: ABCompany, Transaction Method: Bank Transfer, Day: 7-11-2019
-
(Spend) Amount: 50, Item: EzLink TopUp, Transaction Method: NETS, Place: Caldecott MRT, Day: 4-11-2019
-
(Spend) Amount: 107.70, Item: Bicycle, Transaction Method: Cash, Day: 5-11-2019, Place: Toa Payoh Lor 4, Categories: bike
-
(Spend) Amount: 1.10, Item: KopiO, Transaction Method: Cash, Day: 2-11-2019, Categories: drink, kopitiam
Step 1. The user launches the application and switch to the finance mode by executing switch finance.
Step 2. The user wants to set a budget of 300 dollars for November for spendings done using cash. He executes the budget <amt> 300 <month> 11-2019 <met> Cash command to set this budget. The budget command calls Model#addBudget(b), where upon the finance log will add Budget object b to budgetList, the list of budgets.
The interactions inside the Logic Component for budget <amt> 300 <month> 11-2019 <met> cash Command are shown in the sequence diagram below.
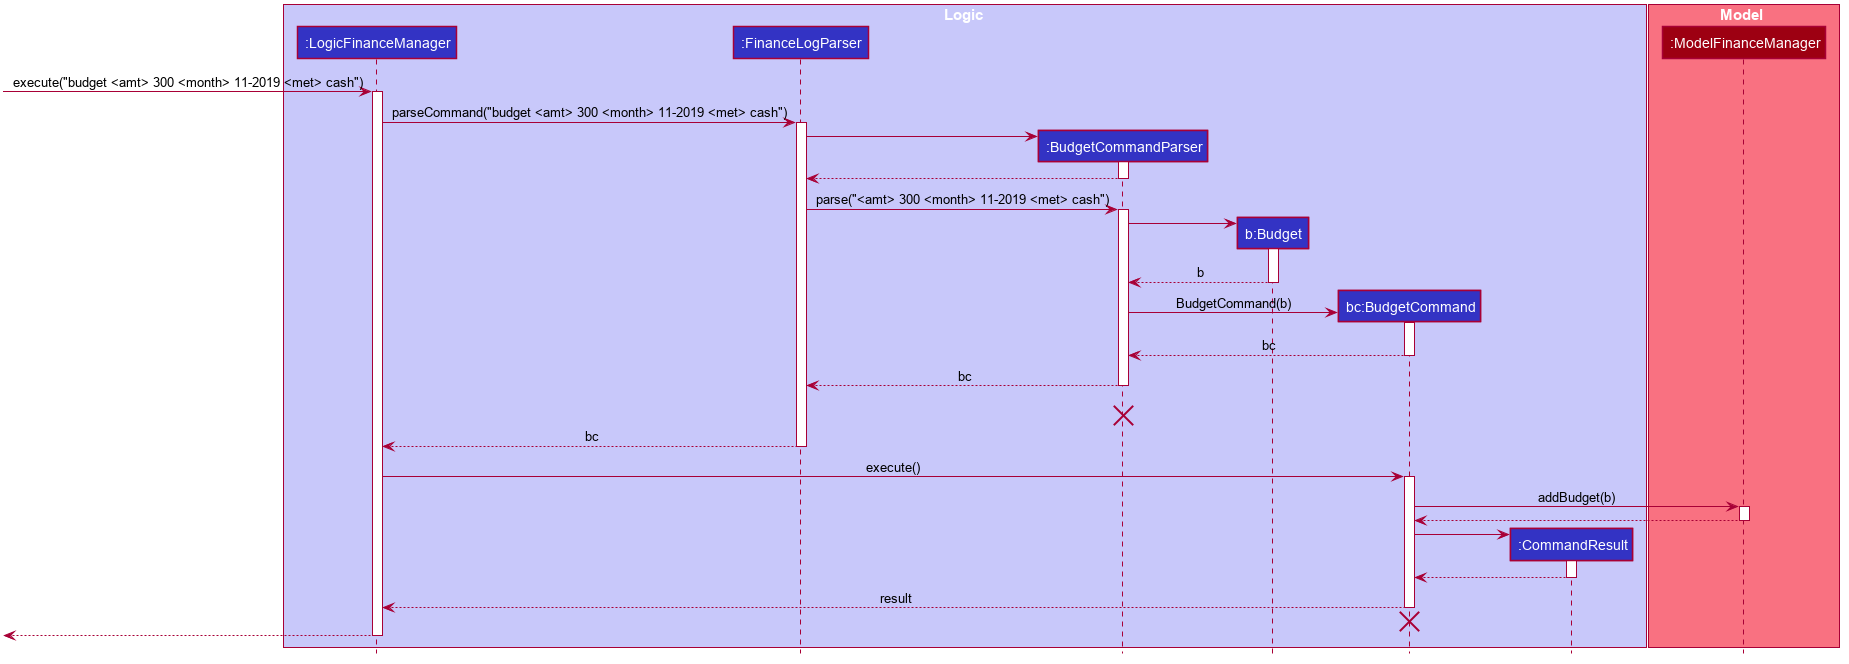
The lifelines for BudgetCommandParser and BudgetCommand should end at the destroy marker (X) but due to a limitation of PlantUML, the lifelines reaches the end of diagram.
|
The interactions in the Model Component for the same command are shown in the sequence diagram below.
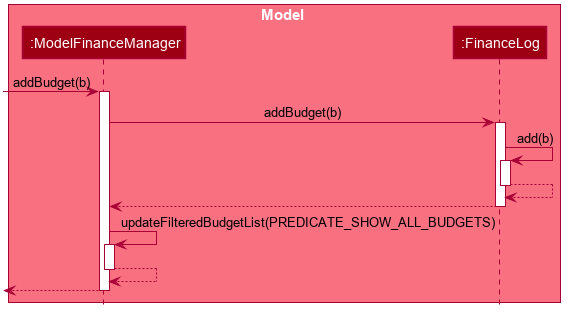
The budget is added to the list of budgets (this being the first budget in the list). The list of budgets will update with the status of each budget.
Modulo will change the view after a budget command to show the list of budgets stored in Modulo.
If the exact same budget already exists in the budget list, it will not call Model#addBudget(b), and this budget will not be added to the list of budgets. Modulo will show an error message that this budget already exists.
|
Step 3. The user now decides to add another entry of spending. This time the user has recently spent 400 dollars on a Nintendo Switch and paid for it using cash. He enters this record with the spend <amt> 400 <item> Nintendo Switch <met> Cash <day> 7-11-2019 command. This entry is added to the list of entries.
Since this entry is paid using cash, transaction date was in November 2019 it is included in the tabulation of the budget. It causes the total amount spent to exceed the budget of 300 dollars, and a red label in the menu bar appears to notify the user that a budget has exceeded.
Step 4. The user views the list of budgets (in this example, there is only one budget) using the listb command.
The window changes to a view of the budget, with information about its status shown.
These information include:
-
Type of budget (for all
Spendentries, for entries done using a specific transaction method, conducted at a specific place or tagged with a specific category) -
Start and end date of budget
-
Progress bar of how much money has been spent (for entries fulfilling budget requirements)
-
Whether the budget is active (current date falls between start and end dates) or not (end date of budget has passed or start date has yet to come)
-
Total amount spend so far
-
Limit set by budget
-
Amount of money left to limit or how much has the budget been exceeded by
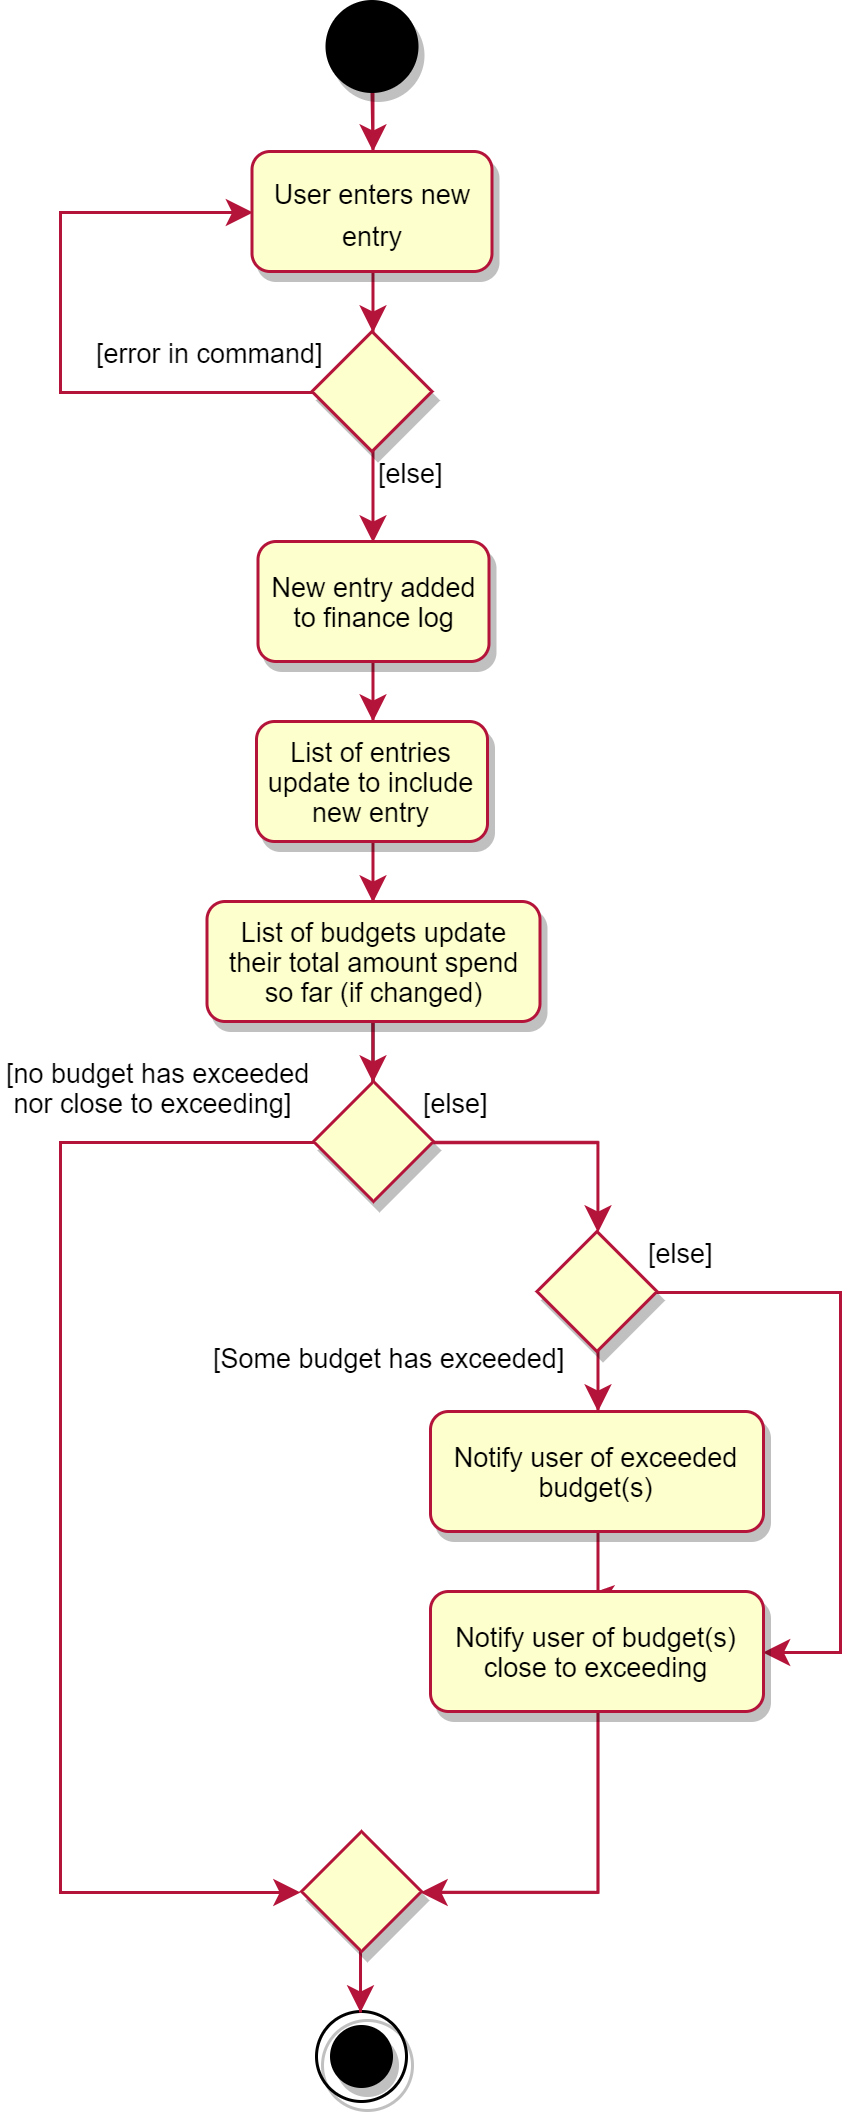
The flow on how what happens when the user enters a new entry is shown in the activity diagram below.
3.5.2. Design Considerations
Aspect: Data structure to support tabulation of spendings
-
Alternative 1 (current choice): Save just the basic details related to the budget - amount (limit to amount to be spent), start and end date, optional requirements
Spendentries should fufill (transaction method, place of spending or category).-
Pros: Less information to store, flexible to changes such as updates to entries during edits (e.g. changes in amounts etc). Budgets can be retrospective (even if dates have past, budgets can still be set to see spending was kept within limits).
-
Cons: Additional step of filtering to obtain entries matching budget requirements before tabulating the total amount - may have performance issues when number of entries is large in terms of time complexity.
-
-
Alternative 2: Budget stores the same information as above, and also the list of entries that fulfill the budget requirements.
-
Pros: Removes the need for filtering entries before tabulation, simply calculate total amount from list of entries stored under the budget.
-
Cons: Will use more memory (now storing the list of entries). Difficult when an entry is delete or modified, have to delete and modify entry accordingly in the list of entries stored under the budget.
-
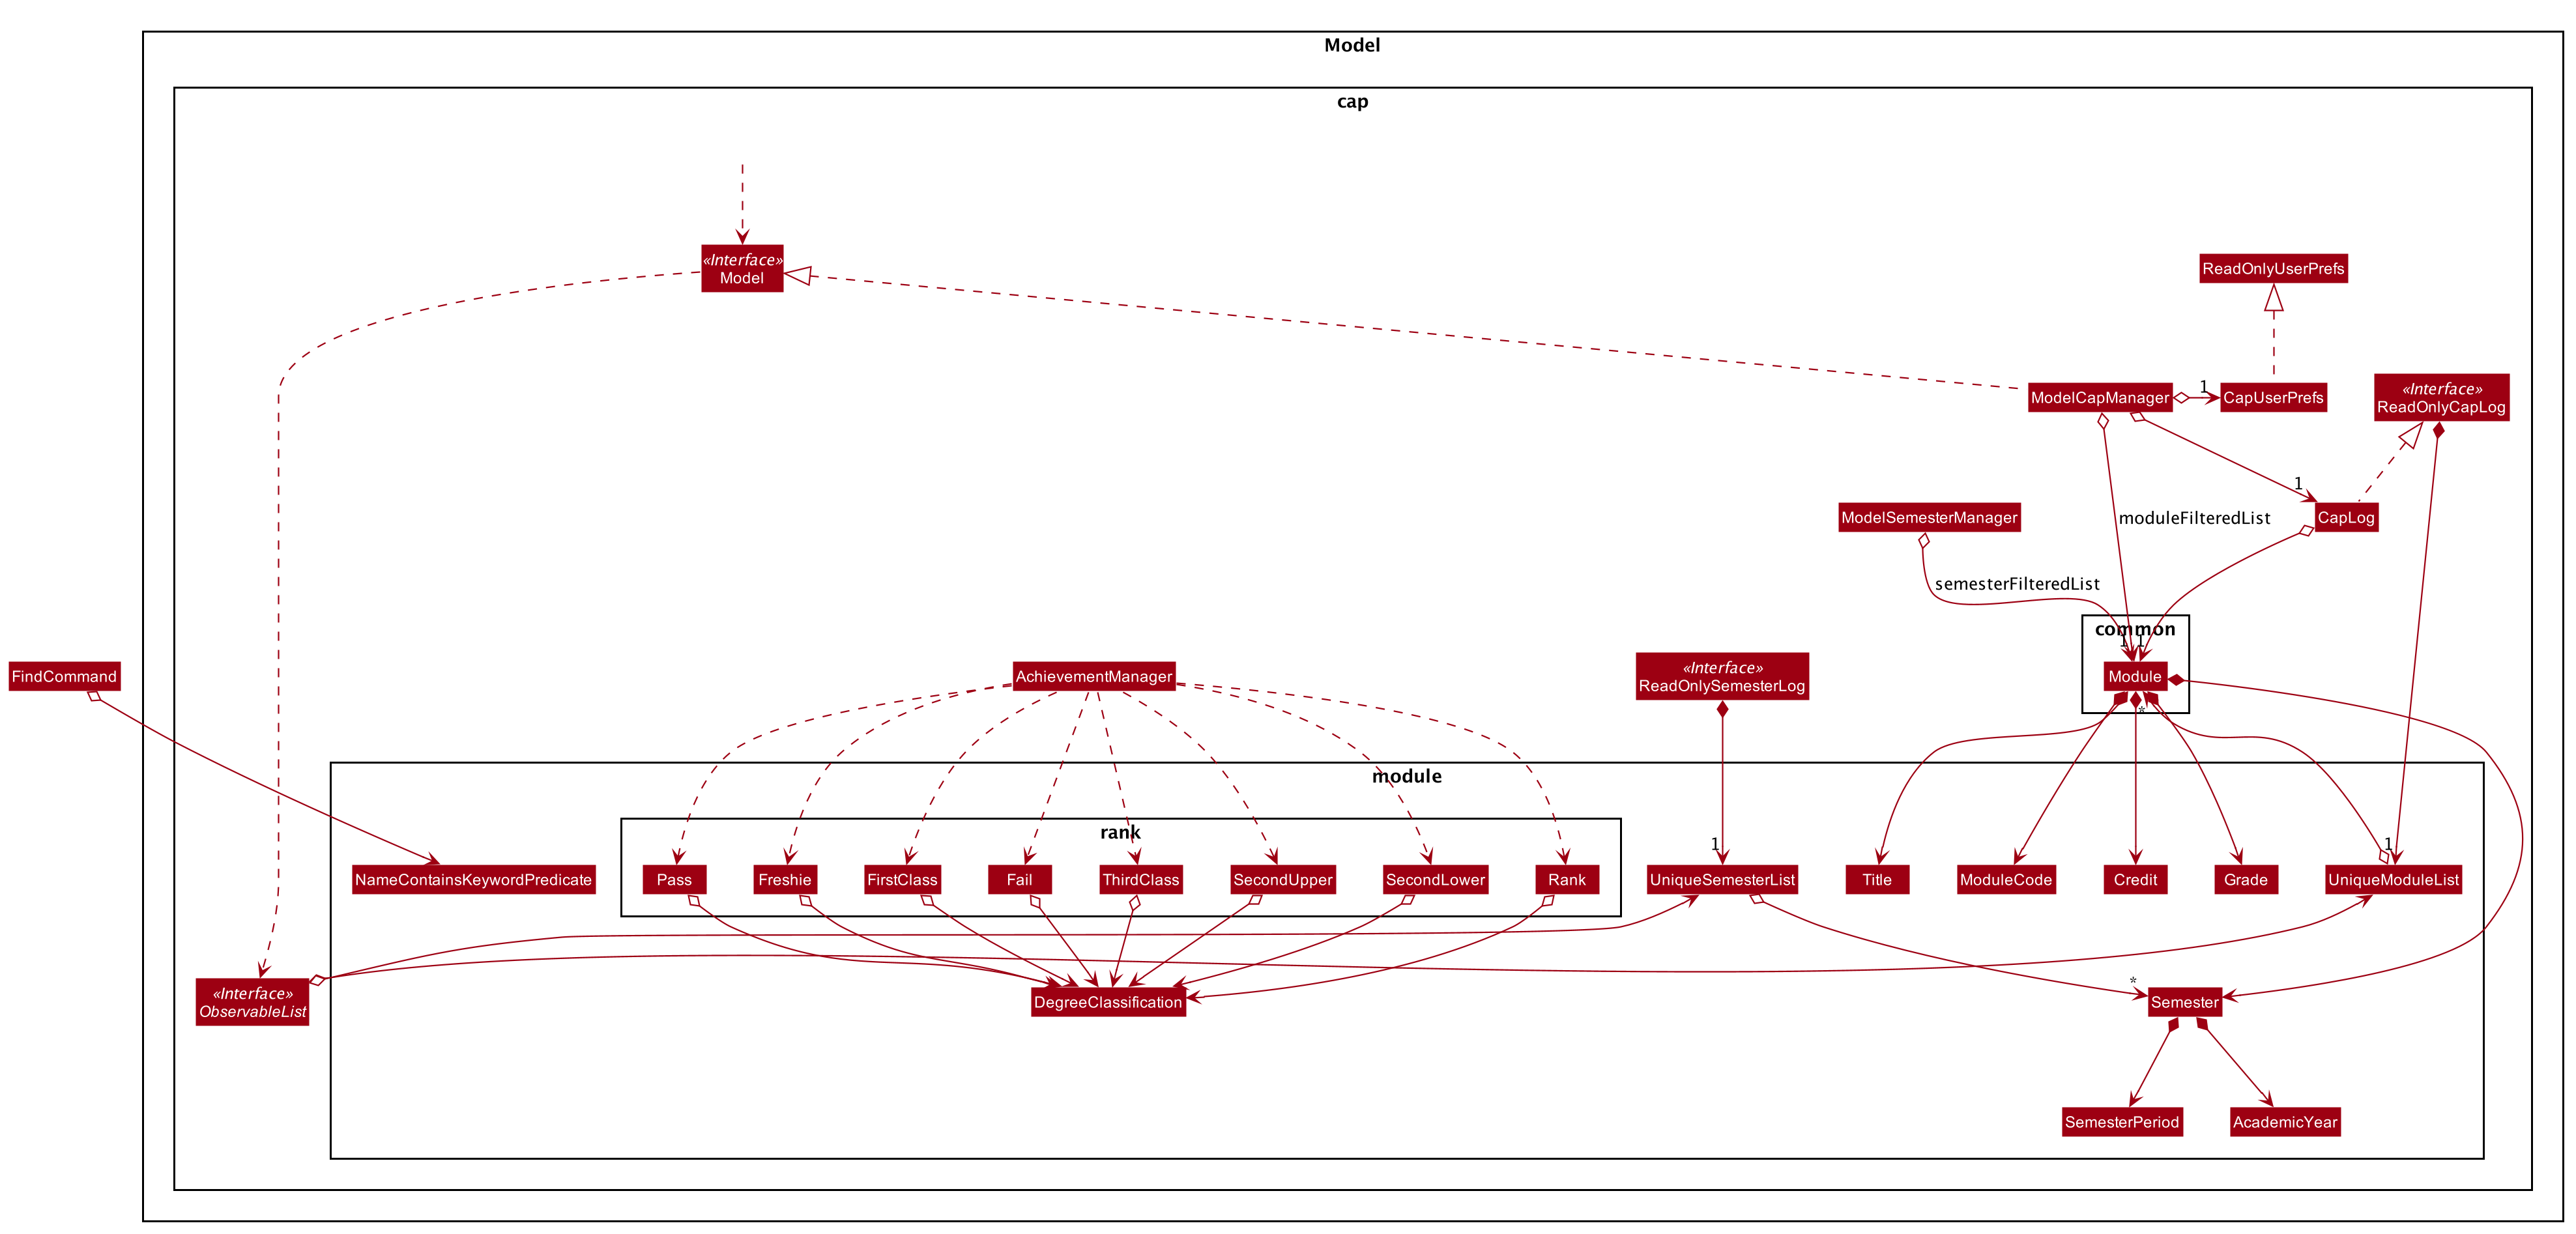
3.6. Grades Tracker
3.6.1. Implementation
The following activity diagram displays the sequence of events after the user inputs to add a new module.
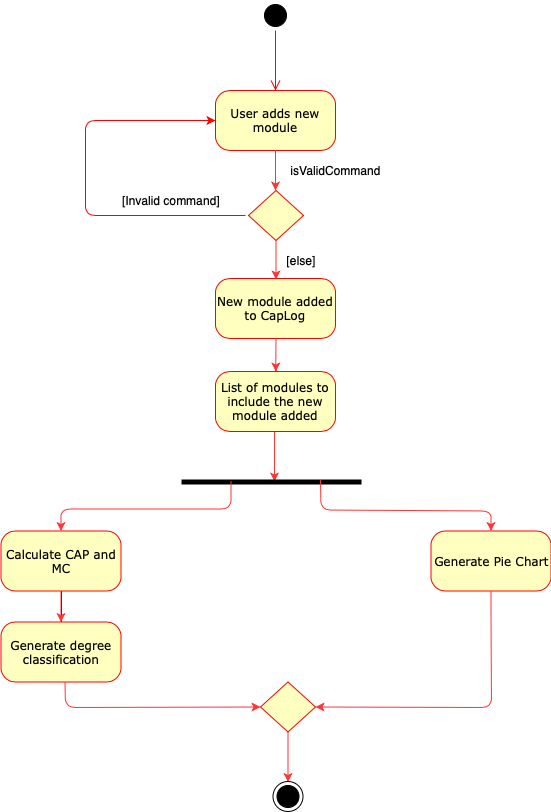
For the user to add new modules to the Modulo Grades Tracker, the Module has to be designed to satisfy the requirements of a module and the needs of the user.
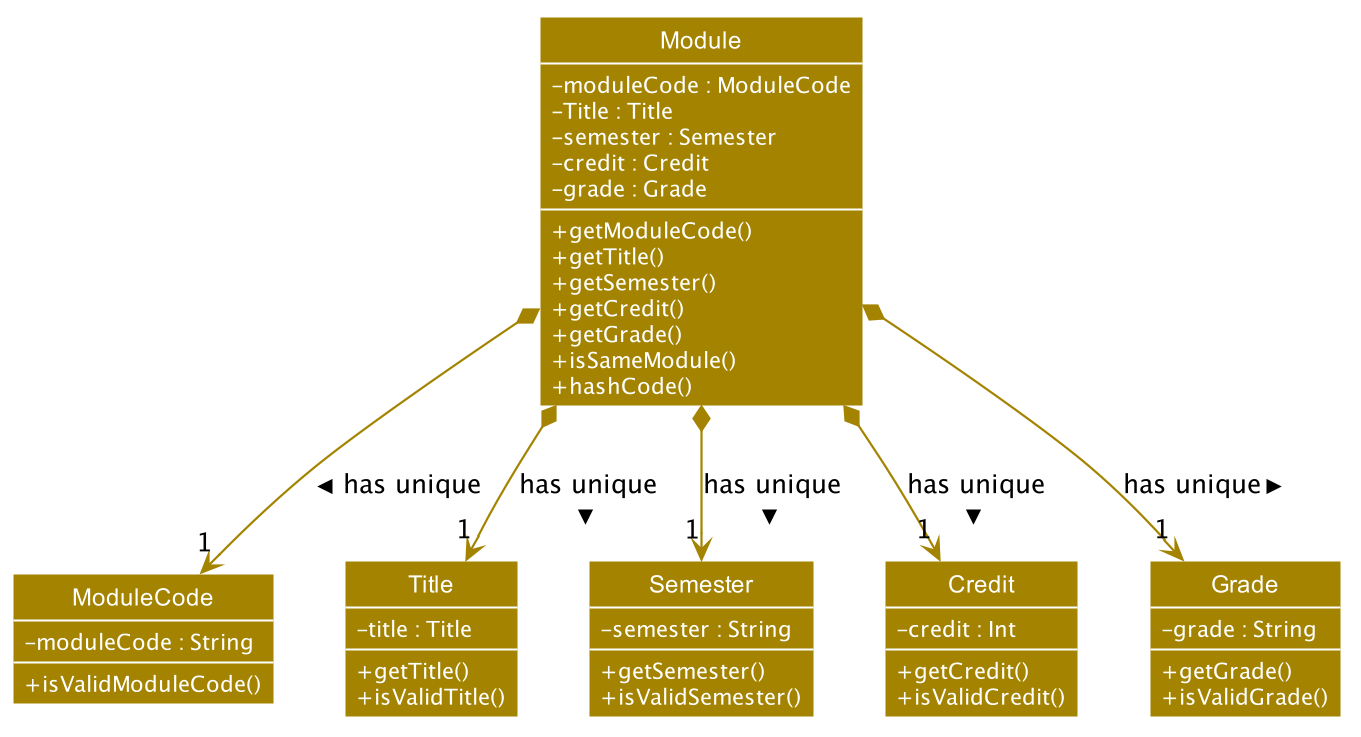
-
Each
Moduleconsists ofModuleCode,Title,Semester,Credit,Grade. -
All fields in
Moduleare unique. -
Each class has their respective getter methods and validity-check method.
3.6.2. Implementation of Module commands
Module class supports multiple commands. They include:
-
AddCommand- Adds a module to the Grades Tracker. -
DeleteCommand- Removes a module from the Grades Tracker by specifying the module code. -
FindCommand- Find and returns any modules withModuleCodeand/orTitlethat matches the keyword specified by the user. -
SortCommand- Sorts the modules in chronological order based on theSemesterthe module was taken. -
ListCommand- List all the modules. Often required after the find command.
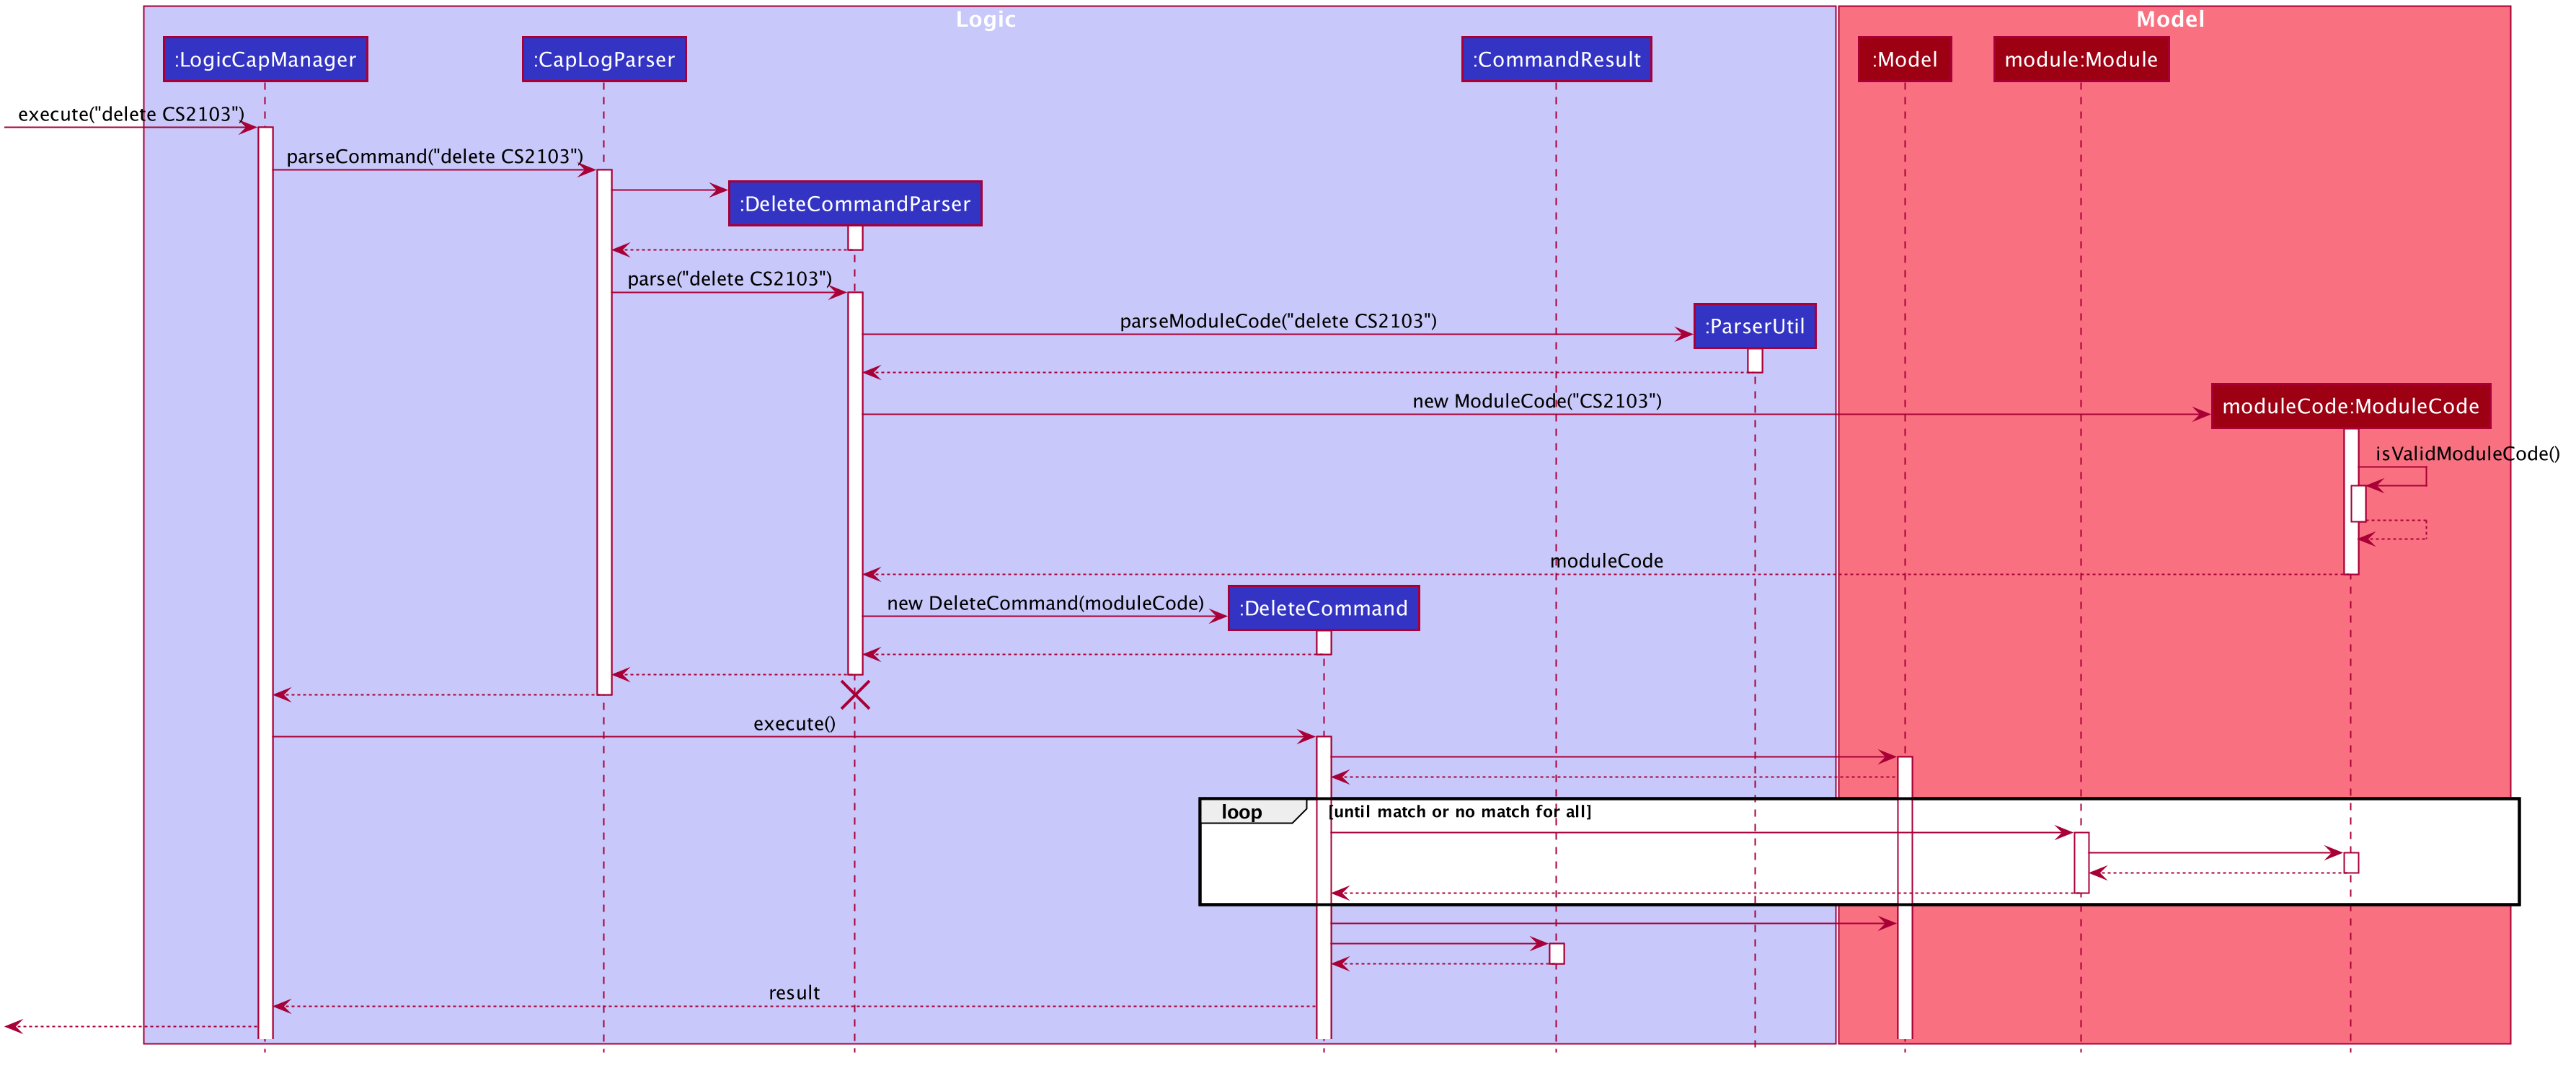
The lifelines for DeleteCommandParser should end at the destroy marker (X) but due to a limitation of PlantUML, the lifelines reaches the end of diagram.
|
After a successful execution, the module with the specified module code will be deleted from Modulo Grades Tracker.
3.6.3. Design Consideration
All fields should not be have special characters or left blank as the details are important to the implementation and the user experience.
The class diagram below gives an overview of the Module class.
The search for the matching module code is implemented with a linear search. With 70 modules in Modulo, the linear search is still responsive and there were not observable lags.
Alternative
An alternative would be to use a search algorithm that comprises a Hash set and linear search.
| Field | Validity |
|---|---|
ModuleCode |
Module code should contain a set of 4 integers and no excessive characters. The student is provided with the liberty to input any module code in consideration that new modules and faculties may be created in the future. |
Semester |
Semester should contain valid academic years and semester period. The academic year stated can only be +/-5 years than the current year, assuming that students are able to graduate in at most five years. While the semester period allows input from 1 to 4. |
Title |
The title of the module is left for the user to define. This is to take into account that there might be new modules released in teh future hence the user needs to have the ability to customise the title. It is valid as long as it does not have special characters. |
Credit |
As stated by NUS, the range of modular credit ranges from 2 to 23. |
Grade |
Only NUS approved grades are allowed i.e. A+, A, A-, B+, B, B-, C+, C, D+, D and F |
4. UI
The User Interface features a sleak and modern interface. The primary concept of the user interface includes simplicity, rounded corners, shadow-like back panes and trendy fonts. We have greatly enhanced the UI from the original addressbook. Borders are removed to ensure a smooth flow of content, delivering a "less is more" modern concept to enhance the user experience.
The quiz feature remains to have a dark theme as the dark theme doesn’t harm the eyes of the user. It uses a more neutral tone to improve the productivity of the user.
5. Documentation
Refer to the guide here.
6. Testing
Refer to the guide here.
7. Dev Ops
Refer to the guide here.
Appendix A: Product Scope
Target user profile:
-
students at the National University of Singapore
-
prefer desktop apps over other types
-
can type fast
-
prefers typing over mouse input
-
is reasonably comfortable using CLI apps
Value proposition: manage modules, tasks, learning (through quizzes) and finances in a single application and with more flexibility than a typical mouse/GUI driven app
Appendix B: User Stories
Priorities: High (must have) - * * *, Medium (nice to have) - * *, Low (unlikely to have) - *
| Priority | As a … | I want to … | So that I can… |
|---|---|---|---|
|
busy and motivated university student |
add my modules by specifying a specific module code or title |
track the modules the student am taking this semester |
|
busy student |
view my schedule for today |
|
|
busy student |
know the deadlines for my tasks |
plan my schedule |
|
new user |
view the user guide easily |
spend less time figuring out how to use the app |
|
organised student |
schedule the times when I plan to do an assignment |
know my timetable for the day |
|
lazy user |
add a tag for each task |
search each task more quickly by using the tag |
|
competitive student |
add some questions and answers that I have learnt today |
read again and attempt them before exam |
|
student with basic finance literacy |
keep a record of my finances |
understand my spending habits |
|
cash-strapped student |
set a budget for the month |
limit my spending |
|
busy and motivated university student |
add my modules by specifying a specific module code or title |
track the grades of the modules that the user has taken |
|
student concerned with his/her CAP |
find out the current CAP and total MCs taken |
display CAP and total MCs with degree classification |
|
person who often make mistakes |
undo my previous actions |
|
|
Busy and organised student |
view the modules that have taken in chronological order |
display the modules in chronological order of their semesters taken |
|
Curious and analytical student |
view the the overall grades make up |
display grades in an analytical format to view the different portion of grades that make up the CAP |
|
busy student |
refer and use the predictive text |
input a command with great ease and less time |
|
forgetful user |
receive reminders on assignments and work near the deadline |
remember to complete and submit it on time |
|
curious student |
calculate and predict how much effort I need to put for a particular module based on the score I have gained so far |
|
|
lazy and forgetful student |
keep track of lectures that I have missed |
|
|
student with too many assignments |
automatically get my assignment sorted according to its grade percentage |
|
|
kiasu student |
make a checklist of materials that I have to learn for my exams |
|
|
student interested in numbers |
view an overall summary of my academic journey so far |
reflect on it |
|
clumsy typer |
have a program that still understand my commands even with minor spelling errors |
not have to enter the command again |
|
calendar app user |
sync my timetable to my own personal calendar |
refer to my schedule |
|
student who often lends money to people |
keep track of the people who have not returned my money |
chase after them for their unpaid debt or refuse to lend to people who consistently borrow but don’t return |
|
student who prefers graphical representation to numbers |
see plots and charts summarising my finances over time and in different categories |
understand the overall status of my finances at a glance and see the trends and changes in my spending habit |
Appendix C: Use Cases
Use case: Add a module task to calendar
MSS
-
User request to add a module task
-
Modulo checks the validity of the request
-
Modulo adds the module task to the user’s calendar
Use case ends.
Extensions
-
2a. The given time is invalid.
-
2a1. Modulo shows an error message.
-
Use case: Record down an entry of borrowing to finance log
Preconditions: User has switched to the finance feature
MSS
-
User enters details of money borrowed.
-
User requests to add a Borrow entry.
-
Modulo adds Borrow entry and displays it in list of log entries.
Use case ends.
Extensions
-
2a. Modulo detects an error in command/details entered.
-
2a1. Modulo shows an error message.
-
2a2. Modulo requests for command to be entered in the correct format.
-
2a3. User enters new line of command with new details.
-
-
Steps 2a1-2a3 are repeated until the command and details entered are in the correct format.
-
Use case resumes from step 3.
Use case: Set a budget
Preconditions: User has switched to the finance feature
MSS
-
User enters details of budget.
-
User requests to add a budget to finance log.
-
Modulo adds the budget and displays it in list of budgets.
Use case ends.
Extensions
-
2a. Modulo detects an error in command/details entered.
-
2a1. Modulo shows an error message.
-
2a2. Modulo requests for command to be entered in the correct format.
-
2a3. User enters new line of command with new details.
-
-
Steps 2a1-2a3 are repeated until the command and details entered are in the correct format.
-
Use case resumes from step 3.
-
2b. Modulo detects that budget already exists in finance log (with all details exactly the same).
-
2b1. Modulo shows an error message.
-
-
Use case ends.
Use case: Record down an entry of borrowing to finance log
Preconditions: User has switched to the finance feature, a budget exists in finance log
MSS
-
User enters details of money spend.
-
User requests to add a Spend entry.
-
Modulo adds Spend entry and displays it in list of log entries.
Use case ends.
Extensions
-
2a. Modulo detects an error in command/details entered.
-
2a1. Modulo shows an error message.
-
2a2. Modulo requests for command to be entered in the correct format.
-
2a3. User enters new line of command with new details.
-
-
Steps 2a1-2a3 are repeated until the command and details entered are in the correct format.
-
Use case resumes from step 3.
-
3a. Spend entry is included under budget and budget is exceeded (i.e. limit set by budget is crossed).
-
3a1. Modulo notifies that budget has been exceeded.
-
3a2. Exceeded budget is marked as so.
-
-
Use case ends.
-
3b. Spend entry is included under budget and budget is close to being exceeded.
-
3b1. Modulo notifies that budget is close to exceeding.
-
-
Use case ends.
Use case: Mark an entry of money lent as repaid
Preconditions: User has switched to the finance feature
MSS
-
User requests to mark Lend entry as repaid.
-
Modulo marks the entry as repaid and record downs the date of repayment.
Use case ends.
Extensions
-
1a. User requests to mark Lend entry as repaid with date of repayment specified.
-
Use case resumes from step 2.
-
2a. Modulo checks that entry was already repaid and notifies user of it.
-
Use case ends.
Use case: View statistical summary of finance log
Preconditions: User has switched to the finance feature
MSS
-
User requests to view statistical summary with type of summary specified.
-
Modulo shows graphs summarising the flow of money in the finance log.
Use case ends.
Extensions
-
1a. Modulo detects an error in command/details entered.
-
1a1. Modulo shows an error message.
-
1a2. Modulo requests for command to be entered in the correct format.
-
1a3. User enters new line of command with new details.
-
-
Steps 1a1-1a3 are repeated until the command and details entered are in the correct format.
-
Use case resumes from step 2.
-
2a. Modulo detects that no entries have been entered in the finance log.
-
1a1. Modulo shows an empty page.
-
-
Use case ends.
Appendix D: Non Functional Requirements
-
Should work on any mainstream OS as long as it has Java
11or above installed. -
Should minimize the amount of typing
-
Should work on various desktop size
Appendix F: Instructions for Manual Testing
Given below are instructions to test the app manually.
F.1. Launch and Shutdown
-
First launch
-
Download the jar file and copy into an empty folder
-
Double-click the jar file
Expected: Shows the GUI with an initial setup page. -
User types in
exit
Expected: Closes the app and GUI
-
-
Subsequent launches
-
Double-click the jar file
Expected: Shows the GUI with the timetable displayed. -
User types in
exit
Expected: Closes the app and GUI
-